Overview
The purpose of this article is to present an introduction to basic binary obfuscation following the process I took in developing a plugin for the LLVM compiler suite to implement automated code obfuscation at compile time. I have implemented support for random junk code insertion to support the generation of somewhat “polymorphic” binaries as well as implemented support for automated string obfuscation at compile time to make reverse engineering of the resulting binaries more difficult.
Part one of this article covers the necessary background on LLVM, setting up a development environment, and developing an LLVM pass for junk code insertion in an attempt to generate unique polymorphic binaries. Part two covers the design and development of the automated string obfuscation mechanism to hinder reverse engineering and analysis of the compiled code.
What is LLVM?
LLVM is an extensible compiler suite that supports customization through modules and plugins. It allows developers to create plugins to customize the functionality of the compiler. For instance, a custom LLVM pass exists to implement the Control Flow Guard (CFG) exploit mitigation as well as things like binary instrumentation for fuzzing/code coverage purposes. The LLVM compiler suite functions as a backend portion of a compiler that handles machine code generation from the LLVM IR (Intermediate Representation).
Compiler suites such as the Clang C/C++ compiler as well as other programming languages like the Swift and Rust compilers use the LLVM project as a backend. These compilers output LLVM IR code, which is then passed to LLVM to generate compiled binaries from the LLVM IR. Any compiler targeting LLVM as a backend automatically supports code generation for any architecture that is supported by LLVM, such as Intel X86 or ARM. The LLVM project also includes a linker (LLD) and other utilities that are useful when developing compilers.
Due to its wide adoption and modular extensible architecture, LLVM is an excellent choice when writing plugins for code obfuscation purposes. By performing obfuscation at the LLVM IR level, it is possible to develop compiler passes for code obfuscation purposes that support multiple programming languages and instruction set architectures.
Setting Up a Development Environment for LLVM
This section details the steps required to set up a development environment for working with LLVM. The steps outlined here assume that you are running Debian GNU/Linux 10 (buster) or a similar Linux distribution; however, with some small adjustments, these instructions could likely be adapted to target other platforms as well.
First, it is necessary to install the necessary packages to compile LLVM by running the apt command given below:
sudo apt -y install build-essential subversion cmake python3-dev libncurses5-dev libxml2-dev libedit-dev swig doxygen graphviz xz-utils clang gdb git vim
Next, we must obtain the LLVM source code by using git to clone the llvm-project repository hosted on Github by running the command given below. In this instance, we are cloning the repository into the “/home/user” directory.
git clone https://github.com/llvm/llvm-project.git
Then switch to the appropriate commit by running “git checkout d3f5769d5e93b30d4a8b4696381d5e4a304992fa” as this is the branch that I used during development. The LLVM API changes quickly, so pinning to a specific commit is recommended to ensure that issues do not arise due to API changes.
To install the custom LLVM passes, you should clone the repository on the Praetorian Github page by changing into llvm/lib/Transforms/ and running “git clone https://github.com/praetorian-adam-crosser/CodeObfs.git”.
The CMakeLists file located at llvm/lib/Transforms/CMakeLists.txt should then be modified to include add_subdirectory(CodeObfs). This modification tells the LLVM build system to compile the CodeObfs transform that includes the junk code insertion and string obfuscation passes.
To build, we now need to cd into the LLVM directory within the LLVM project directory using cd /home/user/llvm-project/llvm in this instance. Then we need to create a build directory by using mkdir build and subsequently running cd build.
We can then leverage CMake to generate a “Makefile” by running cmake ../ from within the build directory and then running make -j<number of threads> to run make with a user-specified number of threads. It should take somewhere between thirty minutes to an hour to compile the entire LLVM source tree from scratch. If you are compiling LLVM in a Virtual Machine (VM), I recommend allocating at least ten gigabytes of RAM as attempting to build in a VM with around four gigabytes of RAM caused ld to fail to link some utilities such as llc.
Developing the Junk Code Insertion Transform
Now that we have finished configuring a development environment, it is time to begin examining the code that is responsible for implementing the junk code insertion LLVM pass. Start by opening the source code file located in “llvm/lib/Transforms/CodeObfs/AddJunk.cpp”. The junk code insertion is a ModulePass meaning that the pass gets invoked on every module (source code file) during compilation. LLVM supports a wide variety of other module types such as FunctionPass that runs on every function and BasicBlockPass which runs on every basic block within the program.
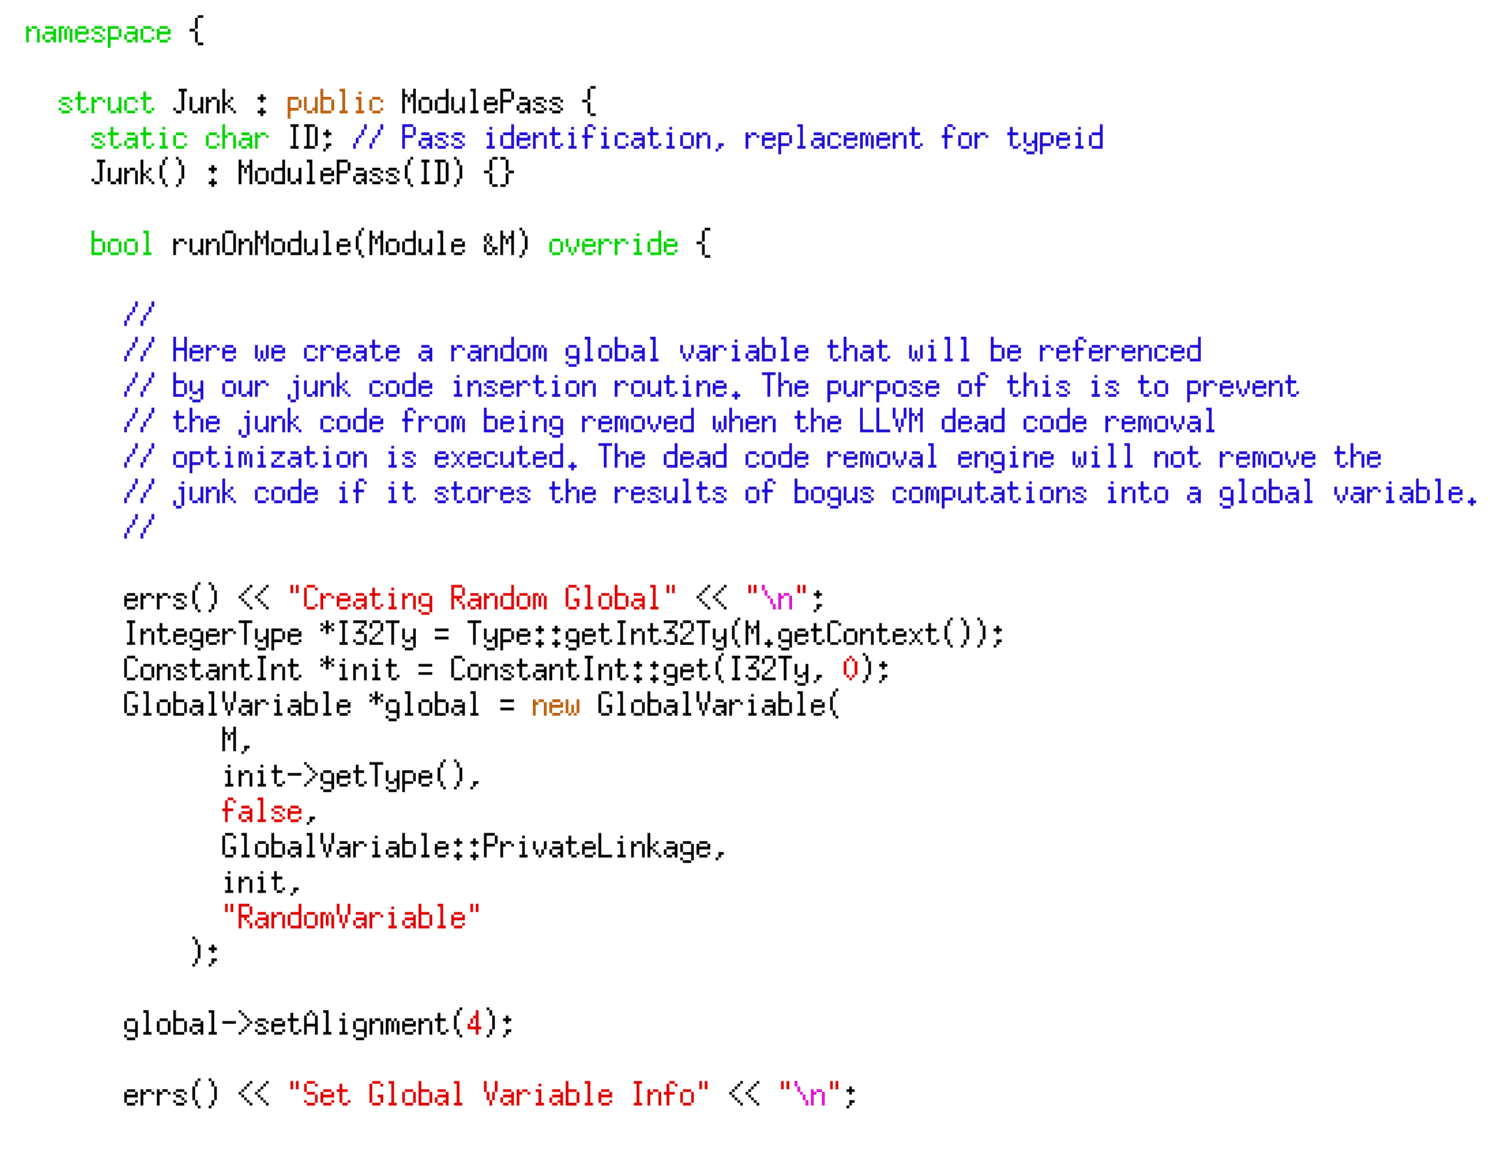
The pass begins by creating a global variable that is referenced by the inserted junk code. The reason behind this is that some LLVM optimizations attempt to remove dead code from the compiled program for optimization purposes. This optimization also has the unfortunate side effect of removing the junk code that we have inserted to evade signature-based detection. If the junk code references a global variable, it doesn’t get marked as dead code and deleted — the code given below implements the fake global variable creation.
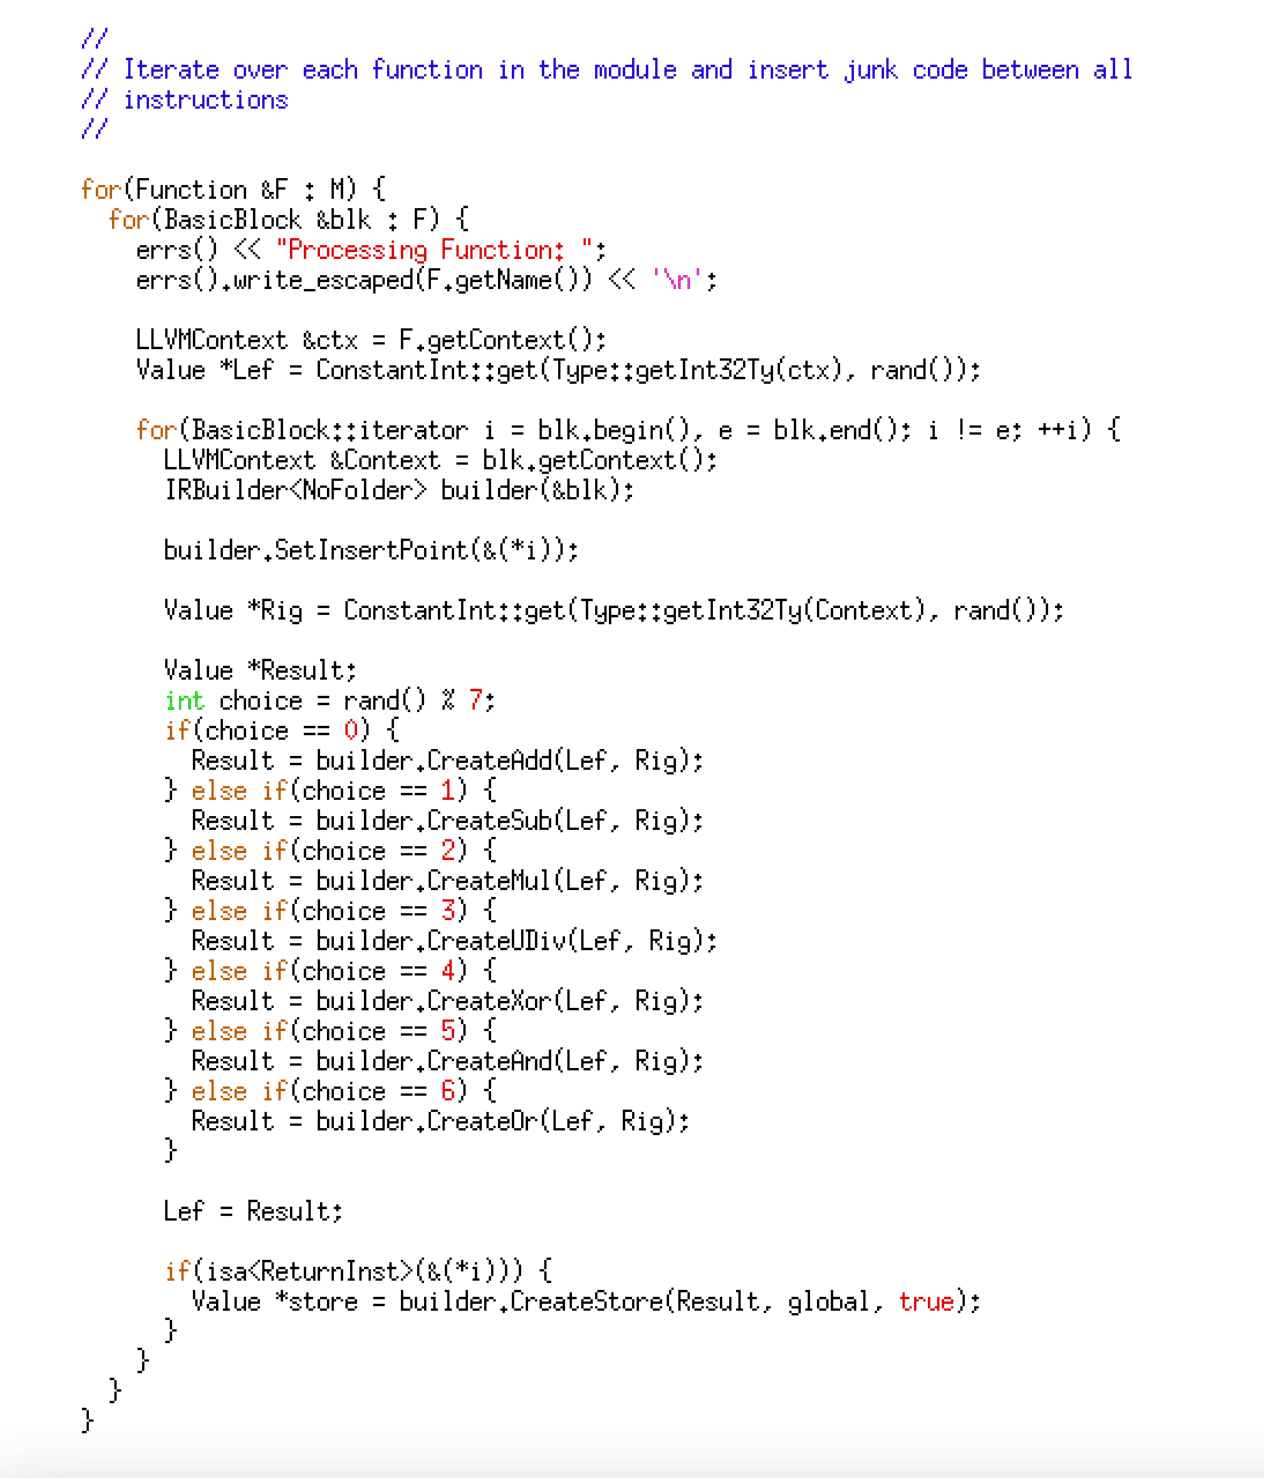
After creating the global variable, it uses a loop to iterate through each function, its corresponding basic blocks, and each of the instructions within those basic blocks. It then chooses and inserts random binary operations using the bitwise operands of AND, XOR, and OR as well as the arithmetic operators such as addition, subtraction, multiplication, and division. The code given below implements the random instruction insertion logic.
Using the Junk Code Insertion Transform
This section describes how to compile an example C program using our junk code insertion LLVM pass. In this instance, we are compiling the program given below.

First, use clang to compile the C program into the LLVM IR.
clang -S -emit-llvm /home/user/calc.c -o /home/user/calc.ll
Next, we use the opt utility that we built when we compiled LLVM to load and invoke our custom LLVM pass that performs the junk code insertion operations.
/home/user/llvm-project/llvm/build/bin/opt -S -load
/home/user/llvm-project/llvm/build/lib/Junk.so -junk /home/user/calc.ll -o /home/user/calc2.ll
Then we use the “llc” command given below to generate a compiled object file targeting the x86 architecture.
/home/user/llvm-project/llvm/build/bin/llc -filetype=obj /home/user/calc2.ll -O0 -o test.o
Finally, we link the compiled object to obtain a linked ELF executable file.
gcc -o test test.o -no-pie
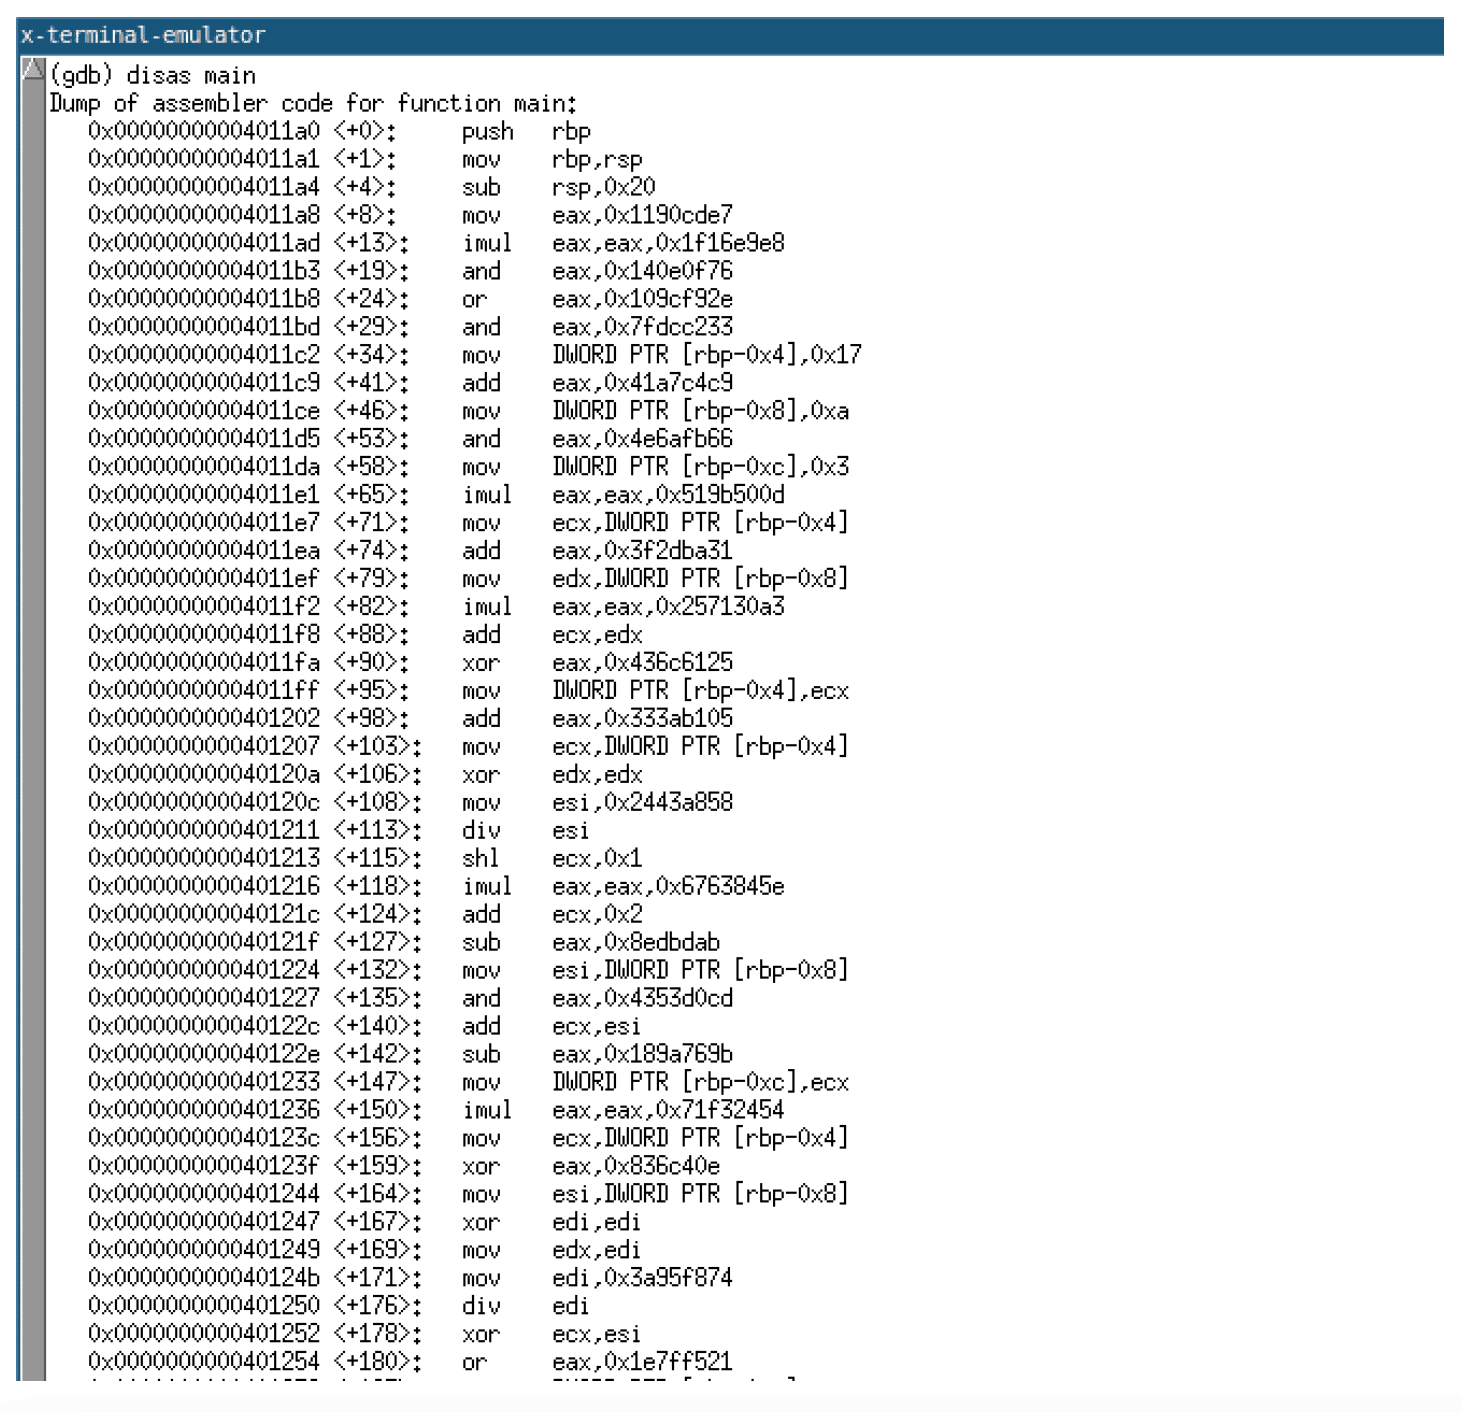
In theory, it should also be possible to perform compilation using Clang with the custom LLVM pass in a single command; however, this process allows you to work through each step of the compilation process, so it is arguably better for learning purposes. Examining the compiled code given below, you can see the instructions inserted by the junk code insertion pass.
Conclusion
In part one, we covered setting up a development environment for the development of LLVM passes for code obfuscation purposes. We covered the details of implementing a simple LLVM pass that performs junk code insertion as well as how to use this LLVM pass during compilation to obfuscate code. In part two, we develop a second LLVM pass to support automated encryption of strings to hinder reverse engineering of the compiled binary.