Overview
Recently, we decided to perform some reverse engineering of the SonicWall NSv appliance to identify any potential remote code execution vulnerabilities within the appliance. During our initial analysis of a virtual machine image for the application, we discovered a customized LUKS encryption mechanism meant to hinder reverse engineering of the application.
We were able to recover the LUKS decryption key by leveraging Qemu with dynamic analysis/debugging within GDB, however, we still didn’t understand how this decryption mechanism actually worked, as it appeared to be a modified version of LUKS. After performing some reverse engineering, we discovered some modifications made to the GRUB LUKS module that included a custom key-derivation algorithm. It derived the key to decrypt the LUKS partition based on the LUKS header of the partition being decrypted.
We analyzed this key-derivation algorithm and developed a utility named sonicwall-nsv-decrypter that calculates the decryption key to decrypt a SonicWall NSv partition based on the LUKS file header. This key can then be used with standard LUKS utilities such as cryptsetup to decrypt and analyze SonicWall NSv partitions containing the core filesystem and application code.
Attempting to Jailbreak the Appliance
We initially attempted to analyze the SonicWall NSv appliance by SSHing into the appliance as the management user. However, the management user account did not have any shell access to the system which hindered reverse engineering of the application. At this point, we were unable to access the underlying filesystem of the application and analyze the application binaries used for the web interface component of the application.
Hurdle One: LUKS Encryption
Normally, to get around these restrictions we could simply boot into a LiveCD and mount the hard disk partitions containing the root filesystem. This would then allow us to modify the /etc/passwd file to run the bash shell when accessing the appliance. We could then either modify sudoers or add a new SUID binary to the system to achieve root access to the image for analysis purposes.
However, when we attempted this with the SonicWall NSv appliance we observed that the core partitions containing the application code and root filesystem were encrypted with LUKS encryption. Figure 1 shows the output of the lsblk command when analyzing the virtual hard disk of the appliance which indicates the ROOT, OEM-CONFIG, OEM, and USR-A partitions were all encrypted with LUKS encryption.
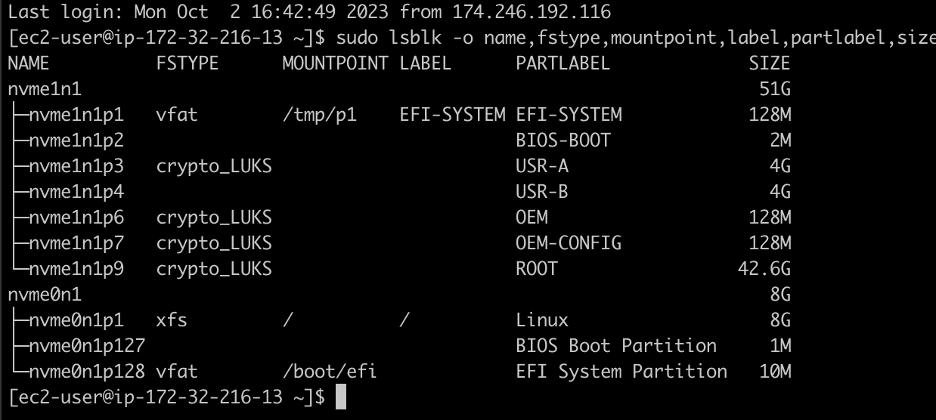
Figure 1: An analysis of the virtual hard disk image containing the SonicWall NSv appliance indicated that all of the core partitions containing application code were encrypted using LUKS encryption.
We were quite perplexed by this as we knew that the appliance booted successfully, meaning at some point it used the correct decryption key to decrypt the filesystem and mount the relevant partitions.
Hurdle Two: GRUB Binaries
Presuming that the decryption key was stored somewhere on the unencrypted EFI-SYSTEM partition, we searched for any LUKS decryption key material. Unfortunately our initial investigation to find explicit decryption keys in the binaries on the partition yielded nothing useful. The EFI-SYSTEM partition was almost entirely GRUB binaries and libraries with no obvious hardcoded keys. However, we were able to find the following grub.cfg file embedded in several different GRUB kernel files:
# 1 "/dev/stdin"

# 1 "<built-in>"

# 1 "<command-line>"

# 1 "/usr/include/stdc-predef.h" 1 3 4

# 1 "<command-line>" 2

# 1 "/dev/stdin"

insmod luks

insmod crypto


set prefix=($root)/coreos/grub

if search --no-floppy --set oem_config_partition --part-label OEM-CONFIG --hint "$root"

then if cryptomount $oem_config_partition

     then configfile (crypto0)/grub.cfg

          echo "System failed to boot, halt in 10 seconds"

          sleep 10

          halt

     else

          echo "System configuration locked, halt in 10 seconds"

         sleep 10

         halt

     fi

else echo "System configuration missing, halt in 10 seconds"

     sleep 10

     halt

fi

echo "System loader failed, halt in 10 seconds"

sleep 10

halt
The use of cryptomount was encouraging to see, since that was obviously how the next partition (labeled as OEM-CONFIG) would be decrypted, but frustratingly the system didn’t appear to provide any passphrase to cryptomount. We scoured the online documentation trying to figure out the default password, and the most frequent comment on “default” LUKS passwords was that there is no such thing as default LUKS passwords.
Hurdle Three: Partition Decryption with Concurrent GRUB Debugging
As a quick sanity check, we attempted to use cryptsetup to decrypt the OEM-CONFIG partition using a blank passphrase, but it was rejected. Clearly some kind of passphrase was in use, but we had no idea where it was. The only way to determine the key would be to debug the GRUB bootloader as it decrypted the partition.
Before doing that we had to identify code where we could drop a breakpoint. We found the code responsible for LUKS decryption unsurprisingly in GRUB’s luks.mod module. In the disk partition we examined, there was a binary explicitly compiled containing only the LUKS decryption logic. Examining the disassembly for this binary helped identify the area where we wanted to drop a breakpoint–right before invoking grub_crypto_pbkdf2 (see Figure 2). Luckily for us, the code performed a check for a unique LUKS macro value, LUKS_KEY_ENABLED (0x00AC71F3), right before invoking this decryption, which simplified building a binary search pattern for finding the code at runtime.
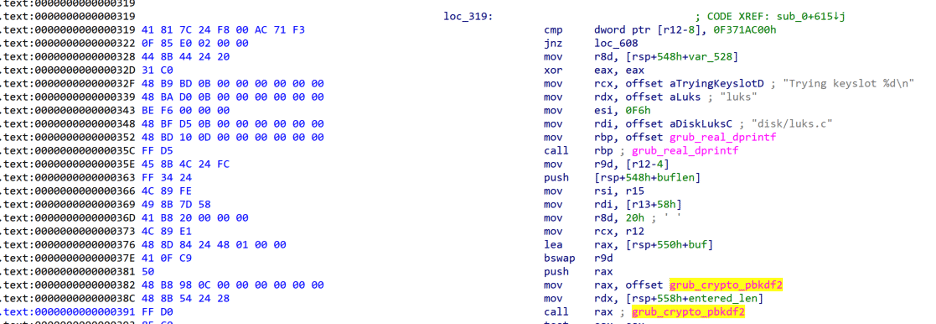
Figure 2: Disassembly of the luks.mod file where it invokes grub_crypto_pbkdf2
Recovering the LUKS Decryption Keys with Qemu
During our research into this peculiar behavior, we identified a blog post written by a user named CataLpa that describes their method of recovering the LUKS keys to decrypt the partitions of the SonicWall NSv appliance. At a high level, this method involves running the appliance in Qemu and leveraging GDB to set a breakpoint on the grub_crypto_pbkdfv2 function that the LUKS module invokes. Below is the qemu-system-x86_64 command we leveraged to run the SonicWall NSv appliance in Qemu which instructed Qemu to start with a GDB debugging listener enabled:
qemu-system-x86_64

  -smp 2

  -m 4G

  -usb

  -device usb-tablet

  -vga virtio

  -display default,show-cursor=on

  -device virtio-net,netdev=vmnic -netdev user,id=vmnic

  -device ich9-intel-hda

  -drive file=sonciwall-snapshot.qcow2,if=virtio

  -bios ./OVMF.fd

  -s -S
After configuring GDB with Qemu we followed the steps from the previously mentioned blog post to boot into the Grub recovery shell and load the luks, crypto, gcry_rajndael, and gcry_sha256 modules with the recovery shell. However, we performed a slightly different step after performing these actions. Instead of searching for the “Trying keyslot %dn” string in memory as they did in the post, we searched for a block of code we identified within the luks_recover_key function itself. This signature is based on the LUKS_KEY_ENABLED constant shown in Figure 2 of the previous section “Attempting to Jailbreak the Appliance”. We searched for this block of code using the following GDB command:
find /b 0xB0000000, 0xD0000000, 0x41, 0x81, 0x7C, 0x24, 0xF8, 0x00, 0xAC, 0x71, 0xF3, 0x0F, 0x85, 0xE0, 0x02, 0x00, 0x00
The result of that command’s execution is the following snippet:
(gdb) find /b 0xB0000000, 0xD0000000, 0x41, 0x81, 0x7C, 0x24, 0xF8, 0x00, 0xAC, 0x71, 0xF3, 0x0F, 0x85, 0xE0, 0x02, 0x00, 0x00

0xbbe7d0f9

0xbe0ef6d1

0xbe34f6e9

warning: Unable to access 16000 bytes of target memory at 0xc07fe0f8, halting search.

3 patterns found.

(gdb)
Identifying the Correct Address
At this point, we had three potential addresses for the luks_recover_key function, which were 0xBBE7D0F9, 0xBE0EF6D1, and 0xBE34F6E9. However, after disassembling the code at all three of these addresses, it became obvious that 0xBBE7D0F9 was the correct address as this was the only code block with the proper relocations applied to the code (see Figure 3).
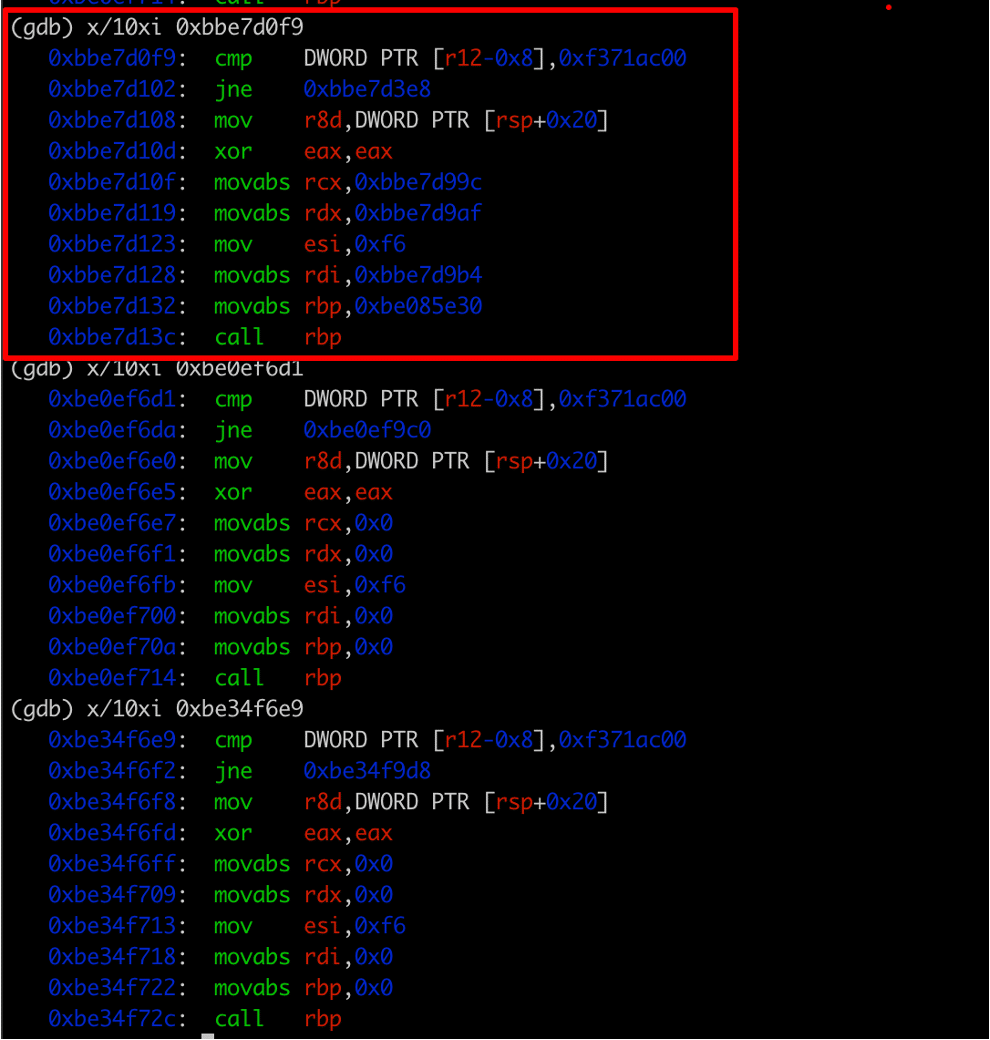
Figure 3: An analysis of the disassembly of each of the three discovered addresses indicated that the first address 0xBBE7D0F9 was the correct address of the luks_recover_key function.
At this point we analyzed the disassembly of the luks_recover_key function and identified the address of the grub_crypto_pbkdf2 function as being 0xBBE88320 (See Figure 4). We placed a breakpoint on the grub_crypto_pbkdf2 function and then triggered decryption of the LUKS encrypted partitions using the grub recovery shell with the cryptomount command.
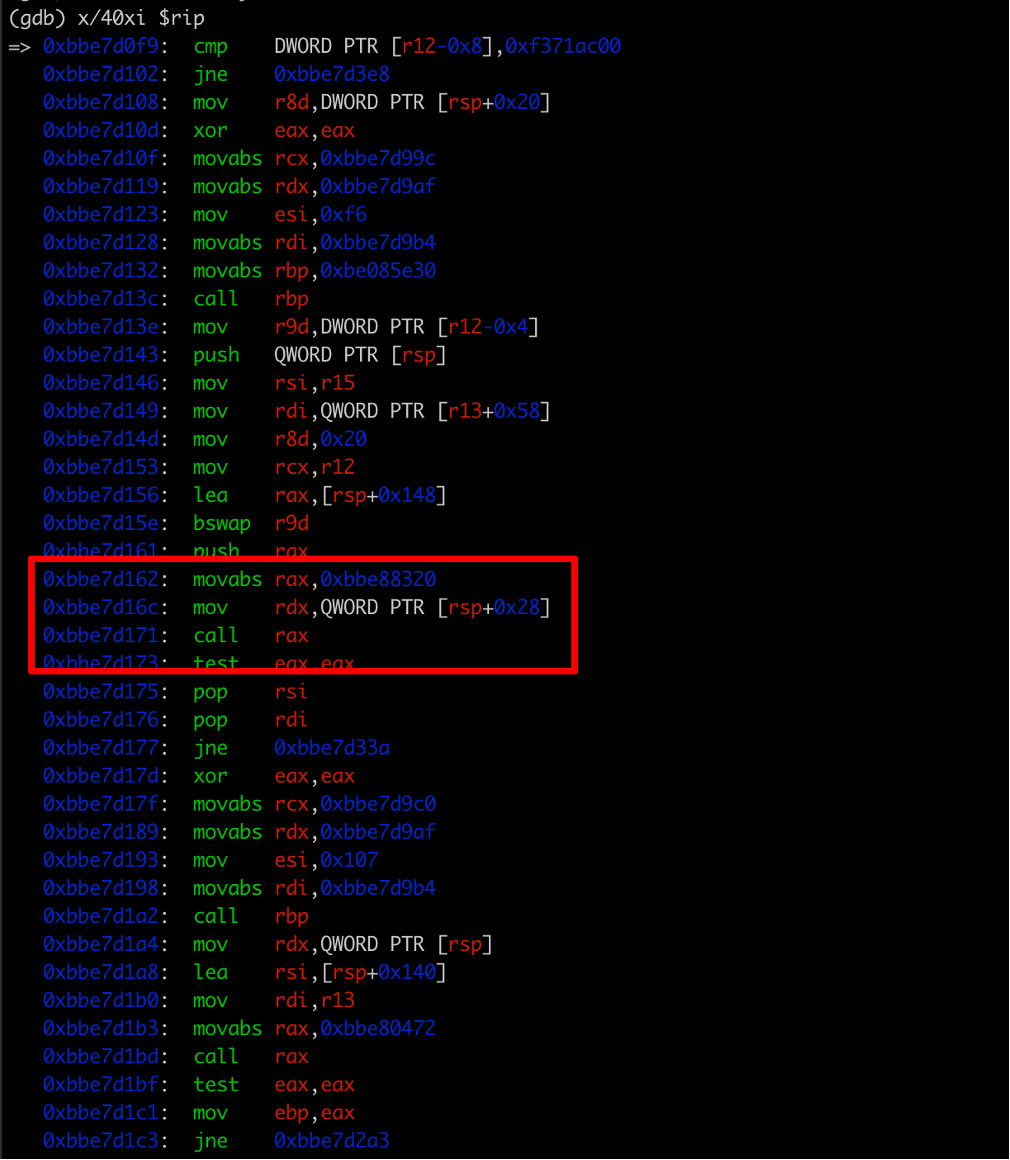
Figure 4: We then analyzed the luks_recover_key function and identified the address of the grub_crypto_pbkdf2 function at 0xBBE7D162, which moves the address of the grub_crypto_pbkdf2 function into the rax register (0xBBE88320).
Recovering a Passed Key
We hit our breakpoint on the grub_crypto_pbkdf2 function and we examined the current register state to obtain the arguments passed to the function. After observing that a 52 byte key was passed to the function to calculate the LUKS decryption key for the partition (See Figure 5), we recovered the passed key by leveraging the RSI register that pointed to the key in memory (See Figure 6).
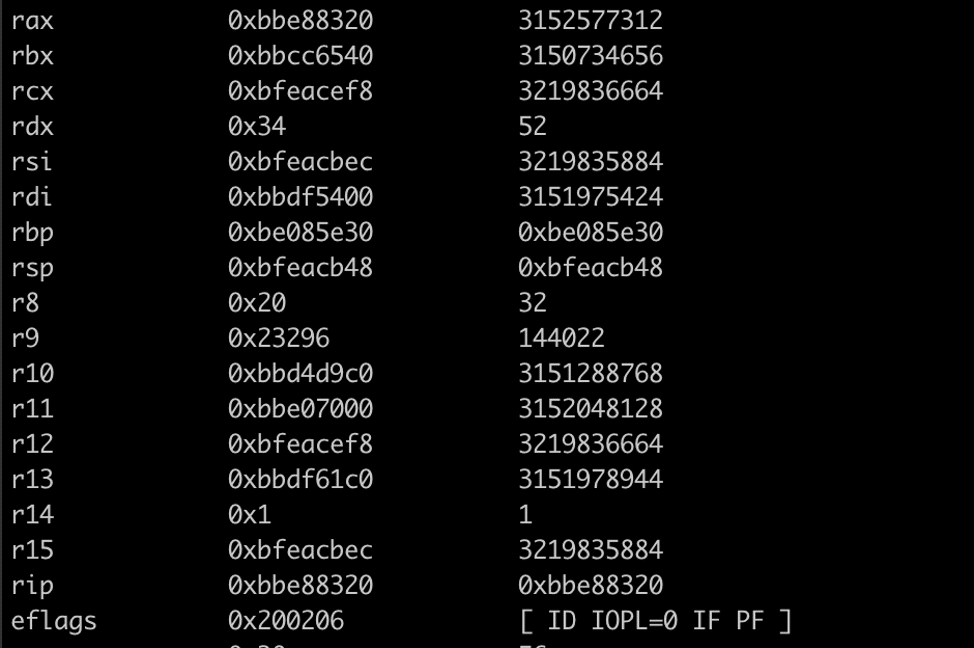
Figure 5: We observed that the passphrase size (rdx) was 52 bytes with a pointer to the passphrase passed to the grub_crypto_pbkdf2 function via the RSI register.
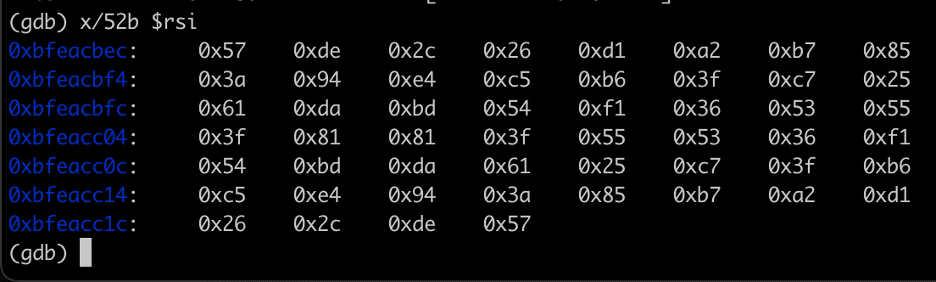
Figure 6: A recovered LUKS passphrase passed to the grub_crypto_pbkdf2 function to derive a decryption key to decrypt a LUKS partition used by SonicWall NSv.
Analyzing the SonicWall NSv GRUB LUKS Module
While we technically had the keys necessary to decrypt the partitions, we still didn’t have an answer to the mystery of WHERE these keys were coming from. Binary searches of the entire unencrypted partition didn’t match any files. How was GRUB just pulling these keys out of nowhere? We’d been nerd-sniped (see Figure 7).

Figure 7: At this point, even though we had recovered the LUKS decryption keys, we were deeply curious as to the origin of the LUKS decryption keys and how they were calculated. Credit: xkcd
Decompiling the Code
Clearly something was not “default” about the LUKS implementation this GRUB bootloader was using. Going back into IDA we looked for logic that didn’t seem to match the source code we’d found online for the module. While most of the code was identical, there was an additional chunk of decompilation which didn’t seem to map back to the source, which we have highlighted in Figure 8.
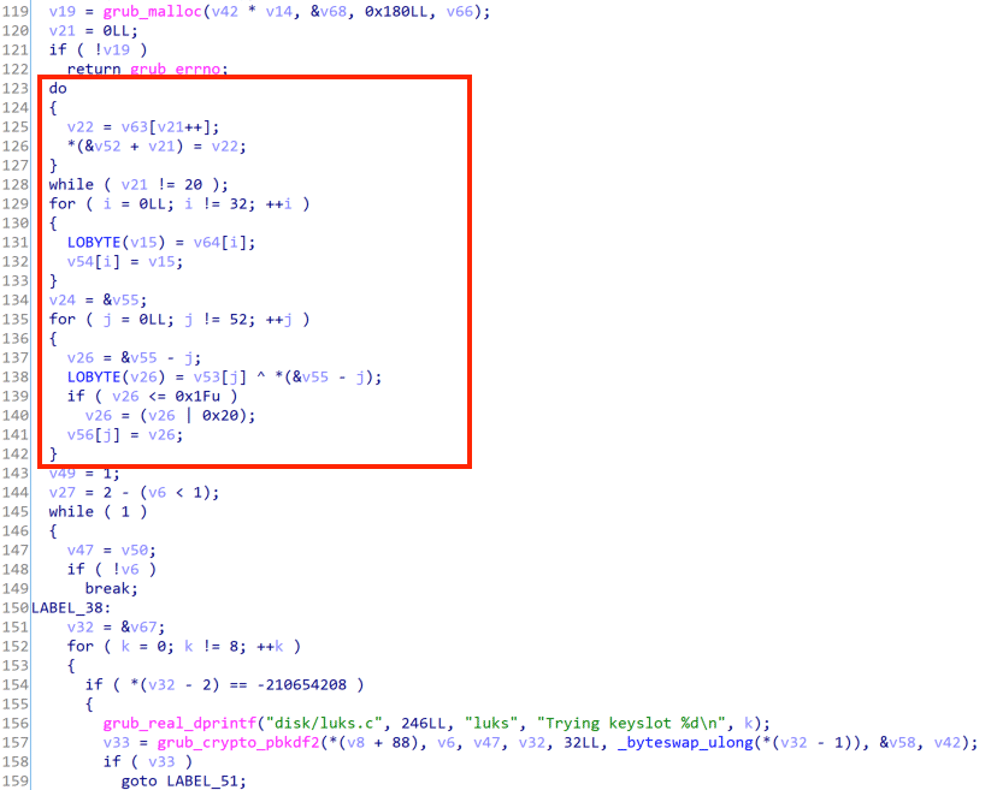
Figure 8: This code didn’t have anything matching in the original LUKS module source code
The code was nearly identical, however, there was an additional chunk of decompiled code that didn’t seem to map back to the original GRUB source code. Decompiled code is unreliable ground truth so this wasn’t unusual to see, but what immediately set off alarm bells was the use of the XOR operator on line 138. The original source code never performed an XOR operation, and XOR outside of traditional cryptography implementations is also the hallmark of someone attempting to roll their own obfuscation.
While clearly something was amiss in this part of the code, we needed to clean the decompiled code to get a better understanding of what was happening. We knew that the memory we were iterating over derived from the LUKS partition header (see Figure 9), but we were unsure how this played into the key derivation.
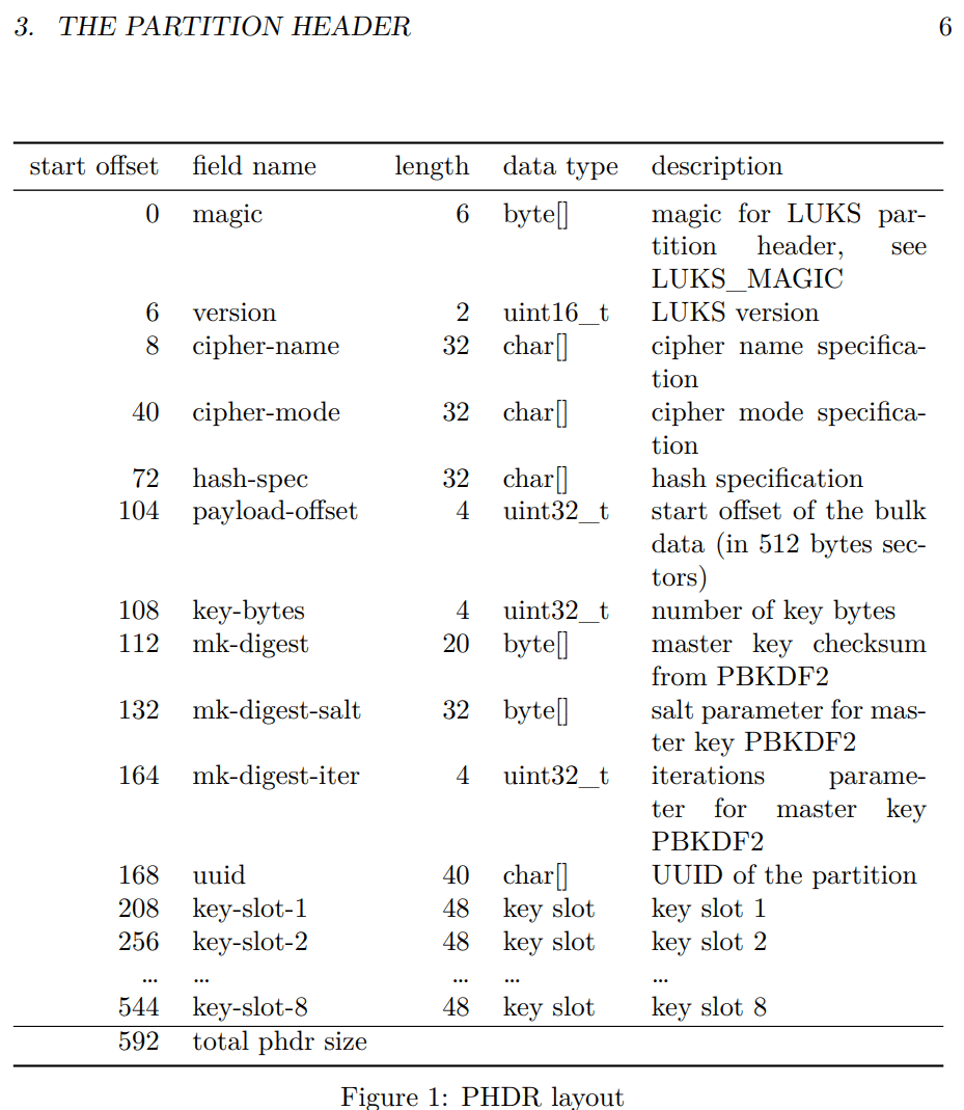
Figure 9: The format of the LUKS partition header
Cleaning the Code
Fortunately the LUKS header had a formal specification which made it straightforward to enter into IDA’s struct window, as in Figure 10. While the UI for defining structs in IDA can be a pain to use, it was crucial for forcing the decompiler into a much more readable format.
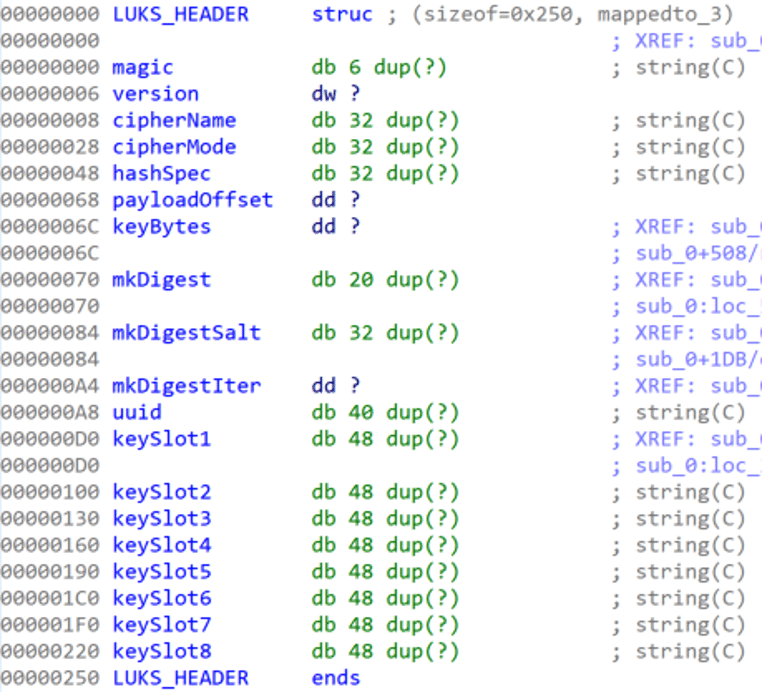
Figure 10: The LUKS_HEADER manually entered into an IDA struct, struct handling in IDA is a great source of joy and pain for reverse engineers
After defining the struct, and telling IDA’s decompiler to use it by defining the appropriate stack variables as a LUKS_HEADER, we had much cleaner code to examine (see Figure 11).

Figure 11: A decompilation of the key derivation algorithm used to generate the LUKS decryption key we identified through reverse engineering.
Eureka!
We now understand that the developers had modified the LUKS module to read the LUKS header of the partition it was decrypting and then derive a decryption passphrase (see Figure 12). The derivation function was to concatenate mk-digest and mk-digest-salt from the header, and then XOR each byte against its “mirrored” position on the opposite end of the byte array. For example, the first byte would be XORed against the last byte, the second byte would be XORed against the second to last byte, and so on. For unknown reasons, they also made sure that each key byte value was always at least 0x20 with an additional check.
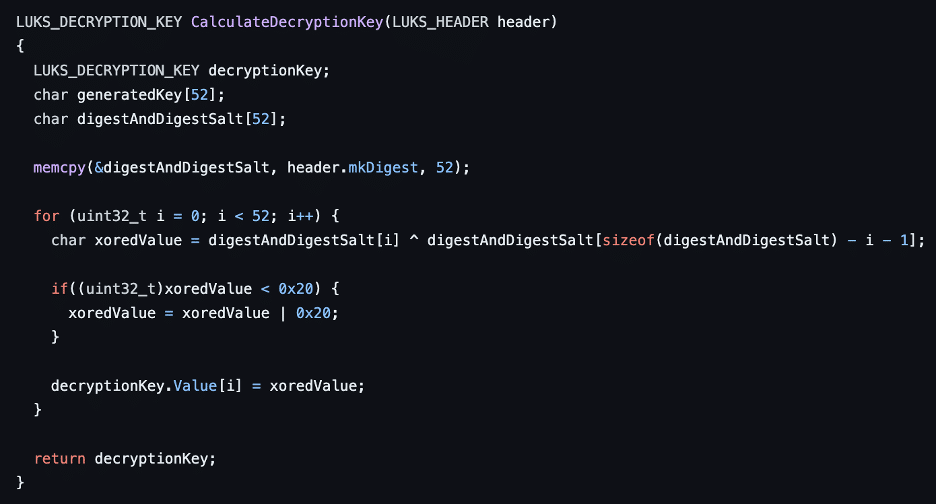
Figure 12: A custom implementation of the key derivation algorithm that the SonicWall NSv appliance’s modified LUKS encryption module used.
We compiled the above code, ran it against the headers for every encrypted partition, and were able to derive each LUKS decryption key (see Figure 13). Interestingly as a side effect of the obfuscation mechanism, every encryption key is a palindrome.
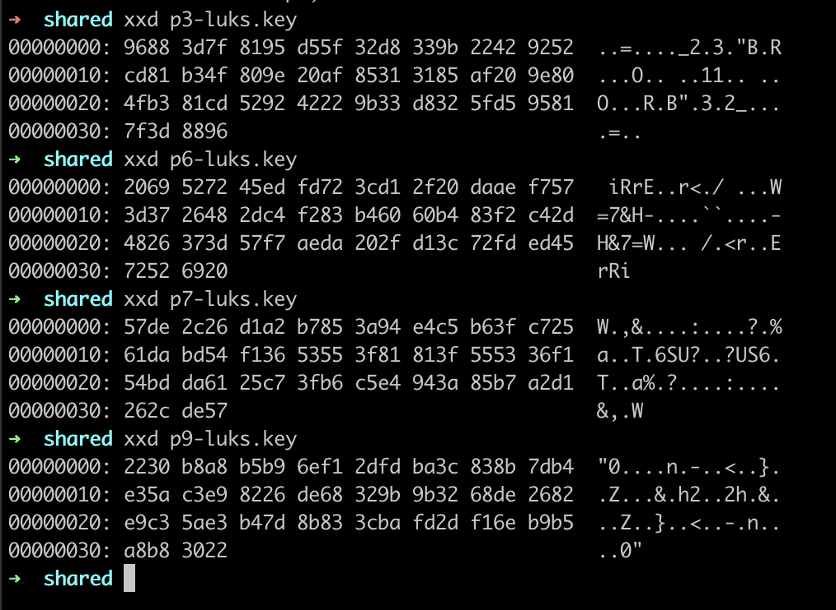
Figure 13: An analysis of the four extracted LUKS decryption keys indicated that all of the extracted keys exactly mirrored each other between the first and last bytes.
(Ab)Using the Keys
Now that we had the decryption keys, we were able to mount each drive by running the following commands:
cat p9-luks.key | sudo cryptsetup luksOpen /dev/nvme1n1p9 decryptedp9

mkdir /tmp/p9

sudo mount /dev/mapper/decryptedp9 /tmp/p9
This decrypted the ROOT partition and mounted it to /tmp/p9, where we could browse around the file system and modify it as desired.
For Sonicwall appliances, a default management user normally runs a very restricted shell. We wanted our full root shell, so we modified the partition’s /etc/passwd at /tmp/p9/etc/passwd to have the management user access /bin/bash as its default shell.
We rebooted the NSv appliance and then were able to ssh into the NSv as the management user while receiving a bash shell. The moment we tried to poke around, however, we received permission denied messages. Management didn’t have root access or sudo privileges. With raw file system access though, this was easy to fix. We logged in as management, copied the local /bin/bash file to /home/management/localbash, and then stopped the machine. Next we re-mounted the ROOT partition using the previously specified commands and ran the following command:
sudo chown root:root /tmp/p9/home/management/localbash

sudo chmod u+s /tmp/p9/home/management/localbash
After rebooting the NSv appliance once more we could login and run ./localbash -p (with -p added to make sure we didn’t drop our root privileges), after which we enjoyed full root access to the NSv appliance as Figure 14 shows.
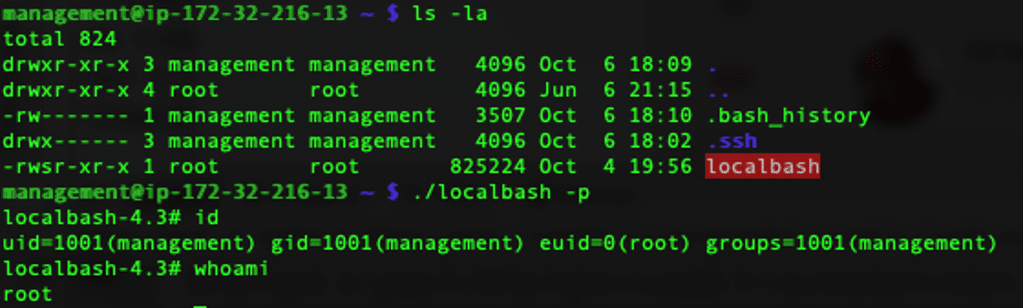
Figure 14: The final fruits of our reverse engineering labor – unrestricted root access to the NSv appliance
Conclusion
Thanks to some overkill reverse engineering, we now have a general solution to decrypt LUKS partitions for all SonicWall NSv appliances that use this custom GRUB module. The decryption tool is available at sonicwall-nsv-decrypter.
While we could have used the keys we obtained from debugging, taking this path helped us better understand the LUKS decryption process and will help us identify other “bespoke” key derivation algorithms in the future. Also we REALLY wanted to know where that key was coming from and now we can sleep better at night.