
The goal of the DVRF project is to simulate a real-world environment to help people learn about other CPU architectures outside of the x86_64 space. The project will also help people get into discovering new things about hardware. As of now this DVRF firmware is tailored for the Linksys E1550 Device. If you do not have one don’t worry! Ready to get a jump start on learning aspects of embedded device hacking for exploit development? If so, this project is for you.
Now that v0.1 has been released for DVRF, I wanted to make this post to help people get started with DVRF even if they don’t have an E1550 in hand. For this post we’ll be going over how to use DVRF with QEMU.
To get started you’ll need to do the following:
$ sudo apt-get install qemu-user-staticReading package lists… DoneBuilding dependency treeReading state information… DoneThe following NEW packages will be installed:qemu-user-static0 upgraded, 1 newly installed, 0 to remove and 25 not upgraded.Need to get 0 B/7,795 kB of archives.After this operation, 79.4 MB of additional disk space will be used.Selecting previously unselected package qemu-user-static.(Reading database ... 173955 files and directories currently installed.)Preparing to unpack .../qemu-user-static_2.0.0+dfsg-2ubuntu1.21_amd64.deb ...Unpacking qemu-user-static (2.0.0+dfsg-2ubuntu1.21) ...Processing triggers for man-db (2.6.7.1-1ubuntu1) ...Setting up qemu-user-static (2.0.0+dfsg-2ubuntu1.21) ...
Once you have qemu-user-static installed you’ll next want to install Binwalk. Make sure to follow the instructions so you have all of the dependancies needed to extract the squash-fs within the DVRF binary. Once Binwalk is installed you will also want to download the uClibc Buildroot tar file. This is crucial since this is going to be your bread and butter for cross compiling and also debugging, especially if you don’t have IDA. To get started do the following:
$ wget https://buildroot.org/downloads/buildroot-2015.11.1.tar.gz––2016-01-20 22:53:34–– https://buildroot.org/downloads/buildroot-2015.11.1.tar.gzResolving buildroot.org (buildroot.org)... 140.211.167.224Connecting to buildroot.org (buildroot.org)|140.211.167.224|:443… connected.HTTP request sent, awaiting response… 200 OKLength: 5460407 (5.2M) [application/x-gzip]Saving to: ‘buildroot-2015.11.1.tar.gz’100%[======================================>] 5,460,407 87.5KB/s in 57s2016-01-20 22:54:33 (92.7 KB/s) - ‘buildroot-2015.11.1.tar.gz’ saved [5460407/5460407]$ tar xzf buildroot-2015.11.1.tar.gz$ cd buildroot-2015.11.1/b1ack0wl@b1ack0wl-VM ~/DVRF/buildroot-2015.11.1 $ lsarch build Config.in.legacy docs Makefile README toolchainboard CHANGES configs fs Makefile.legacy supportboot Config.in COPYING linux package system
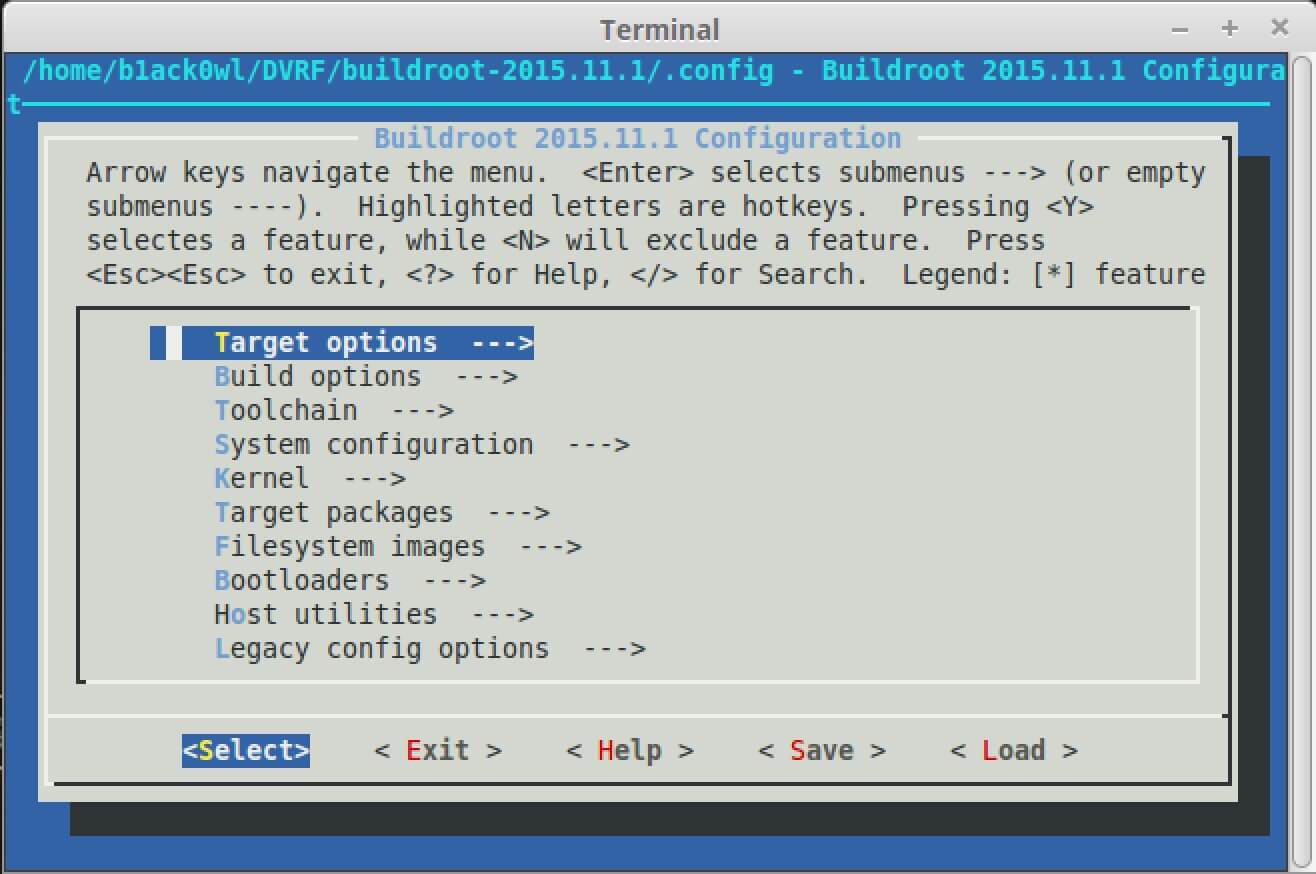
Now you’re going to type make menuconfig and when it’s done you’re going to see the following:
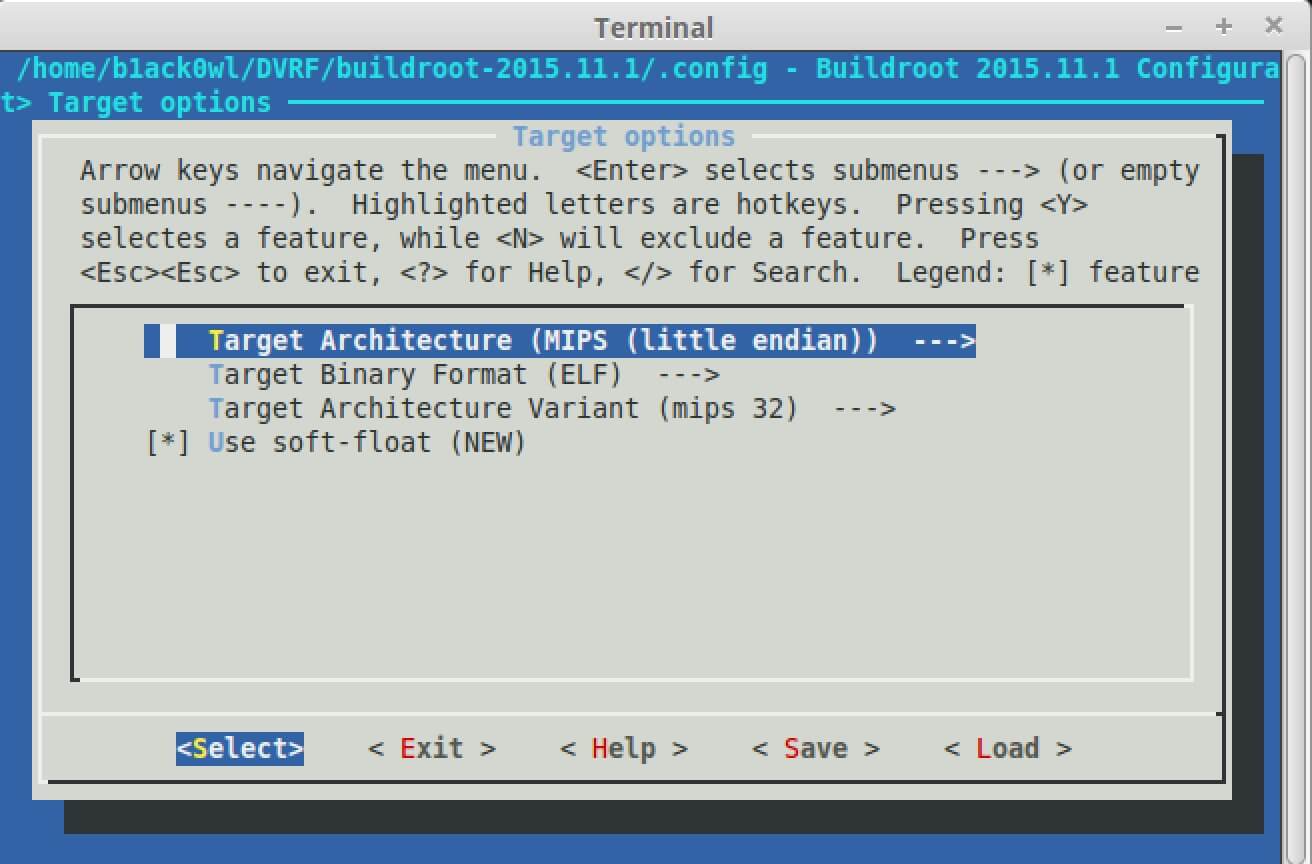
Under Target you’re going to select MIPS little endian, ELF, and mips32. Soft float can be enabled since for now it doesn’t matter for the exercises I have under /pwnables.
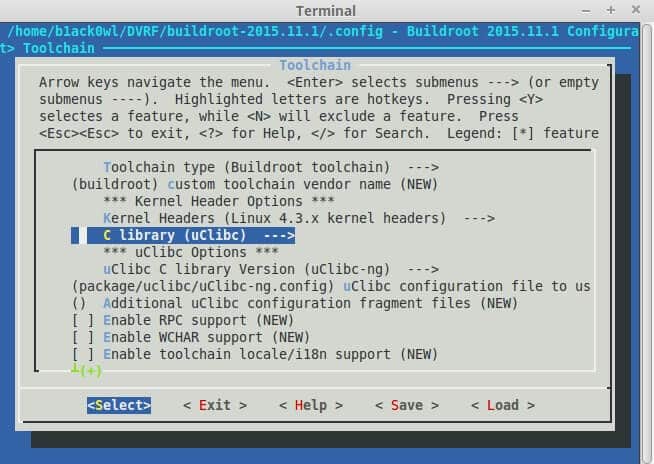
Under Toolkit you’ll want to set the C Library to uClibc since the binary is compiled with this library and most devices you’ll come across will be using this C library.
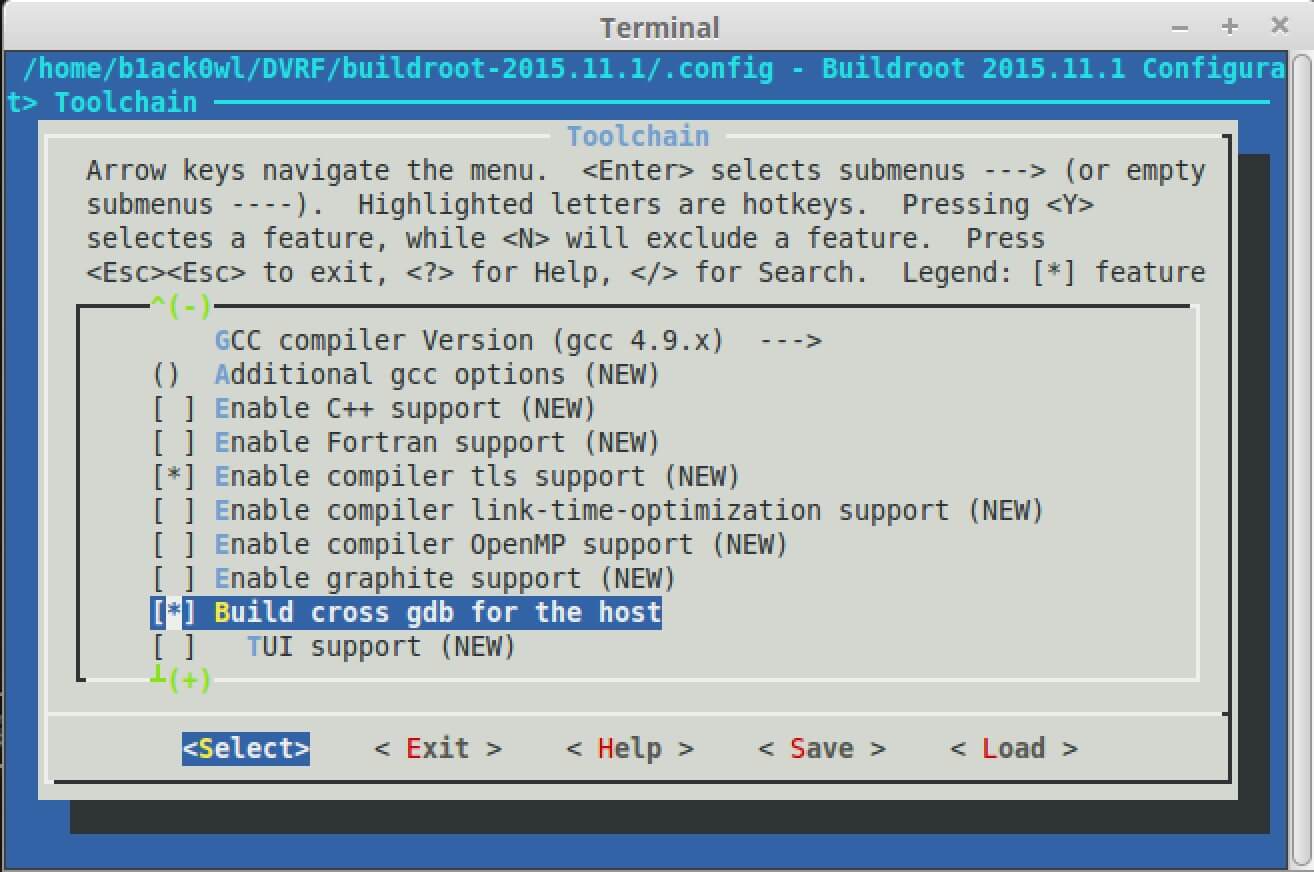
Also under Toolkit you’ll want to enable “Build cross gdb for the host.” This will create a gdb binary that will run on your host (e.g. x86_64) but will support your target Architecture (e.g. MIPS). This is helpful for debugging applications when using the -g argument in Qemu.
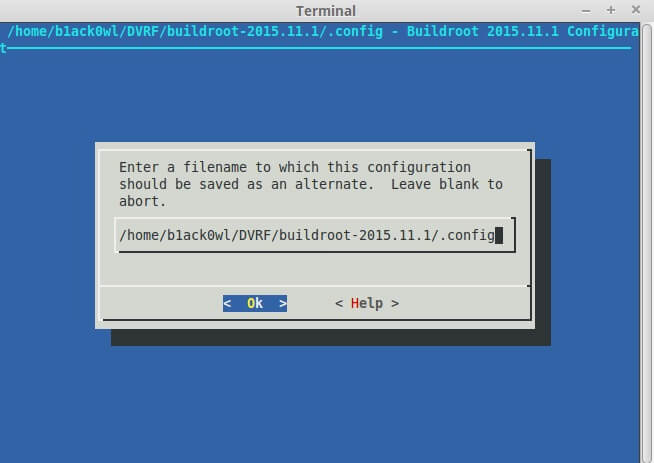
Make sure to save your configuration changes so that your toolkit will compile for the right Architecture we’ve chosen.
Now feel free to either explore what other options the toolkit can provide or exit the menu and type “make” but be warned that this process does take a while so it might be a good time to go grab a cup of coffee and also make sure you have an internet connection since this process will download tar files that are needed for compiling.
b1ack0wl@b1ack0wl-VM ~/DVRF/buildroot-2015.11.1 $ make menuconfig*** End of the configuration.*** Execute 'make' to start the build or try 'make help'.b1ack0wl@b1ack0wl-VM ~/DVRF/buildroot-2015.11.1 $ make/usr/bin/make -j1 HOSTCC="/usr/bin/gcc" HOSTCXX="/usr/bin/g++" silentoldconfigmake[1]: Entering directory /home/b1ack0wl/DVRF/buildroot-2015.11.1'mkdir -p /home/b1ack0wl/DVRF/buildroot-2015.11.1/output/build/buildroot-config/lxdialog[...Truncated…]
Once the toolkit has finished compiling you’ll see a new folder called output. This is where the toolkit compiled, but we’ll only care about what’s been compiled into the host folder within output.
b1ack0wl@b1ack0wl-VM ~/DVRF/buildroot-2015.11.1 $ lsarch build Config.in.legacy dl linux output supportboard CHANGES configs docs Makefile package systemboot Config.in COPYING fs Makefile.legacy README toolchainb1ack0wl@b1ack0wl-VM ~/DVRF/buildroot-2015.11.1 $ cd output/b1ack0wl@b1ack0wl-VM ~/DVRF/buildroot-2015.11.1/output $ lsbuild host images staging targetb1ack0wl@b1ack0wl-VM ~/DVRF/buildroot-2015.11.1/output $ cd host/usr/b1ack0wl@b1ack0wl-VM ~/DVRF/buildroot-2015.11.1/output/host/usr $ lsbin include lib libexec mipsel-buildroot-linux-uclibc share x86_64-unknown-linux-gnub1ack0wl@b1ack0wl-VM ~/DVRF/buildroot-2015.11.1/output/host/usr $ cd bin/b1ack0wl@b1ack0wl-VM ~/DVRF/buildroot-2015.11.1/output/host/usr/bin $ ls *-build*mipsel-buildroot-linux-uclibc-addr2line mipsel-buildroot-linux-uclibc-gcovmipsel-buildroot-linux-uclibc-ar mipsel-buildroot-linux-uclibc-gdbmipsel-buildroot-linux-uclibc-as mipsel-buildroot-linux-uclibc-gprofmipsel-buildroot-linux-uclibc-cc mipsel-buildroot-linux-uclibc-ldmipsel-buildroot-linux-uclibc-cc.br_real mipsel-buildroot-linux-uclibc-ld.bfdmipsel-buildroot-linux-uclibc-c++filt mipsel-buildroot-linux-uclibc-ldconfigmipsel-buildroot-linux-uclibc-cpp mipsel-buildroot-linux-uclibc-lddmipsel-buildroot-linux-uclibc-cpp.br_real mipsel-buildroot-linux-uclibc-nmmipsel-buildroot-linux-uclibc-elfedit mipsel-buildroot-linux-uclibc-objcopymipsel-buildroot-linux-uclibc-gcc mipsel-buildroot-linux-uclibc-objdumpmipsel-buildroot-linux-uclibc-gcc-4.9.3 mipsel-buildroot-linux-uclibc-ranlibmipsel-buildroot-linux-uclibc-gcc-4.9.3.br_real mipsel-buildroot-linux-uclibc-readelfmipsel-buildroot-linux-uclibc-gcc-ar mipsel-buildroot-linux-uclibc-sizemipsel-buildroot-linux-uclibc-gcc.br_real mipsel-buildroot-linux-uclibc-stringsmipsel-buildroot-linux-uclibc-gcc-nm mipsel-buildroot-linux-uclibc-stripmipsel-buildroot-linux-uclibc-gcc-ranlib
You can see that we have cross compilers and an instance of gdb. We will use this for crafting our exploits. Now that we have binwalk, buildroot, and qemu-user-static installed we can get started on the first pwnable within the Intro folder. First we need to extract the contents within the binary file. We will use binwalk to help us extract the binary with options -e for Extract and -M for Matryoshka which will extract recursively for up to 8 layers deep.
$ binwalk -eM ./DVRF_v01.binScan Time: 2016-01-21 19:44:52Target File: /home/b1ack0wl/DVRF/DVRF_v01.binMD5 Checksum: 34dced9038b2d1e205b6c0f68991ccfeSignatures: 343DECIMAL HEXADECIMAL DESCRIPTION––––––––––––––––––––––––––––––––––––––––––––––––––––––––––––––––––––––––––––––––––––––––––––––––––––––––––––––––––––––––––––––––––––––––––––––––––––––––––––––––0 0x0 BIN-Header, board ID: 1550, hardware version: 4702, firmware version: 1.0.0, build date: 2012-02-0832 0x20 TRX firmware header, little endian, image size: 7753728 bytes, CRC32: 0x97096BA6, flags: 0x0, version: 1, header size: 28 bytes, loader offset: 0x1C, linux kernel offset: 0x192704, rootfs offset: 0x060 0x3C gzip compressed data, maximum compression, has original file name: "piggy", from Unix, last modified: 2015-12-31 10:44:221648420 0x192724 Squashfs filesystem, little endian, non-standard signature, version 3.0, size: 6099526 bytes, 447 inodes, blocksize: 65536 bytes, created: 2016-01-19 01:47:20[...Truncated…]
You will now have a folder that should start with _DVRF which contains all of the necessary files for these exercises. So go ahead and change directory to DVRFv01.bin.extracted/squashfs-root/ and perform the following.
b1ack0wl@b1ack0wl-VM ~/DVRF/_DVRF_v01.bin.extracted/squashfs-root $ cp `which qemu-mipsel-static` ./b1ack0wl@b1ack0wl-VM ~/DVRF/_DVRF_v01.bin.extracted/squashfs-root $ lsbin etc media proc qemu-mipsel-static sys usr wwwdev lib mnt pwnable sbin tmp varb1ack0wl@b1ack0wl-VM ~/DVRF/_DVRF_v01.bin.extracted/squashfs-root $
We need to have the statically built Qemu instance on our squash-fs root directory since we are going to chroot the environment when emulating the binaries. So we’re pretty much ready to get started! Let’s go ahead and test out our environment by performing the following command: sudo chroot <current directory> <qemu-mipsel-static> <path to binary to emulate> argv[1]
b1ack0wl@b1ack0wl-VM ~/DVRF/_DVRF_v01.bin.extracted/squashfs-root $ sudo chroot . ./qemu-mipsel-static ./pwnable/Intro/stack_bof_01 test123Welcome to the first BoF exercise!You entered test123Try Again
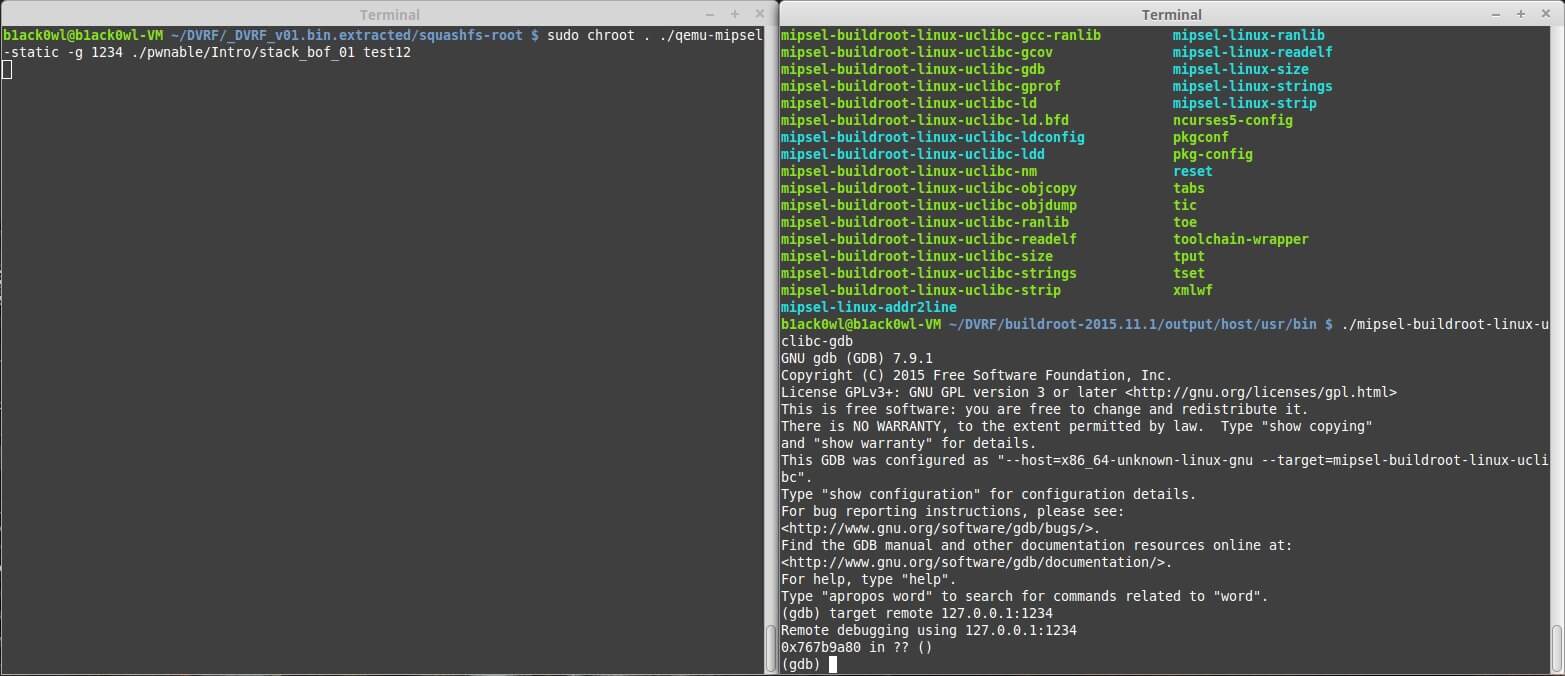
Awesome!! We can execute the binary without any issues! Now for the last step we need to debug the application and we will use qemu again but we will feed it the -g argument which will attach a gdbserver instance to it but won’t execute the binary until an attached gdb instance initiates the continue instruction.
First get two terminals open and in one terminal type in the following command: sudo chroot . ./qemu-mipsel-static -g 1234 ./pwnable/Intro/stackbof01 test123 Remember -g 1234 means that gdbserver is going to start listening on port 1234. Now in the other terminal window you’ll want to use the crossed compiled gdb that’s located within the buildroot output folder.
You should now be at this step:
Just for fun you can even disassemble the file using the objdump we compiled with option -D
b1ack0wl@b1ack0wl-VM ~/DVRF/buildroot-2015.11.1/output/host/usr/bin $ ./mipsel-buildroot-linux-uclibc-objdump -D ~/DVRF/_DVRF_v01.bin.extracted/squashfs-root/pwnable/Intro/stack_bof_01 | more/home/b1ack0wl/DVRF/_DVRF_v01.bin.extracted/squashfs-root/pwnable/Intro/stack_bof_01: file format elf32-tradlittlemipsDisassembly of section .interp:004000f4 <.interp>:4000f4: 62696c2f 0x62696c2f4000f8: 2d646c2f sltiu a0,t3,276954000fc: 696c4375 0x696c4375400100: 732e6362 0x732e6362400104: 00302e6f 0x302e6fDisassembly of section .reginfo:00400108 <.reginfo>:400108: b20001f6 0xb20001f6...40011c: 00448ce0 0x448ce0Disassembly of section .dynamic:00400120 <_DYNAMIC>:400120: 00000001 movf zero,zero,$fcc0400124: 00000083 sra zero,zero,0x2400128: 00000001 movf zero,zero,$fcc040012c: 000000ac 0xac400130: 0000000c syscall400134: 0040059c 0x40059c[...Truncated…]004007e0 <main>:4007e0: 3c1c0005 lui gp,0x54007e4: 279c8500 addiu gp,gp,-314884007e8: 0399e021 addu gp,gp,t94007ec: 27bdff18 addiu sp,sp,-2324007f0: afbf00e4 sw ra,228(sp)4007f4: afbe00e0 sw s8,224(sp)4007f8: 03a0f021 move s8,sp4007fc: afbc0010 sw gp,16(sp)400800: afc400e8 sw a0,232(s8)400804: afc500ec sw a1,236(s8)400808: 8f82801c lw v0,-32740(gp)40080c: 00000000 nop400810: 94420b98 lhu v0,2968(v0)400814: 00000000 nop400818: a7c20018 sh v0,24(s8)40081c: 27c2001a addiu v0,s8,26400820: 240300c6 li v1,198400824: 00402021 move a0,v0400828: 00002821 move a1,zero40082c: 00603021 move a2,v1400830: 8f998040 lw t9,-32704(gp)400834: 00000000 nop400838: 0320f809 jalr t940083c: 00000000 nop400840: 8fdc0010 lw gp,16(s8)400844: 8fc200e8 lw v0,232(s8)[...Truncated…]00400950 <dat_shell>:400950: 3c1c0005 lui gp,0x5400954: 279c8390 addiu gp,gp,-31856400958: 0399e021 addu gp,gp,t940095c: 27bdffe0 addiu sp,sp,-32400960: afbf001c sw ra,28(sp)400964: afbe0018 sw s8,24(sp)400968: 03a0f021 move s8,sp40096c: afbc0010 sw gp,16(sp)400970: 8f82801c lw v0,-32740(gp)400974: 00000000 nop400978: 24440c60 addiu a0,v0,316840097c: 8f998050 lw t9,-32688(gp)400980: 00000000 nop400984: 0320f809 jalr t9400988: 00000000 nop40098c: 8fdc0010 lw gp,16(s8)400990: 00000000 nop400994: 8f82801c lw v0,-32740(gp)400998: 00000000 nop40099c: 24440c94 addiu a0,v0,3220[...Truncated…]
So all we need to do to solve this is change the return pointer to function <dat_shell> which is located at 0x00400950 remember this is little endian and we cannot use NULL bytes but once you get the picture you should just about have the following:
b1ack0wl@b1ack0wl-VM ~/DVRF/_DVRF_v01.bin.extracted/squashfs-root $ sudo chroot . ./qemu-mipsel-static ./pwnable/Intro/stack_bof_01 "[REDACTED]"Welcome to the first BoF exercise!You entered [REDACTED]Try AgainCongrats! I will now execute /bin/sh- b1ack0wlqemu: uncaught target signal 11 (Segmentation fault) - core dumped
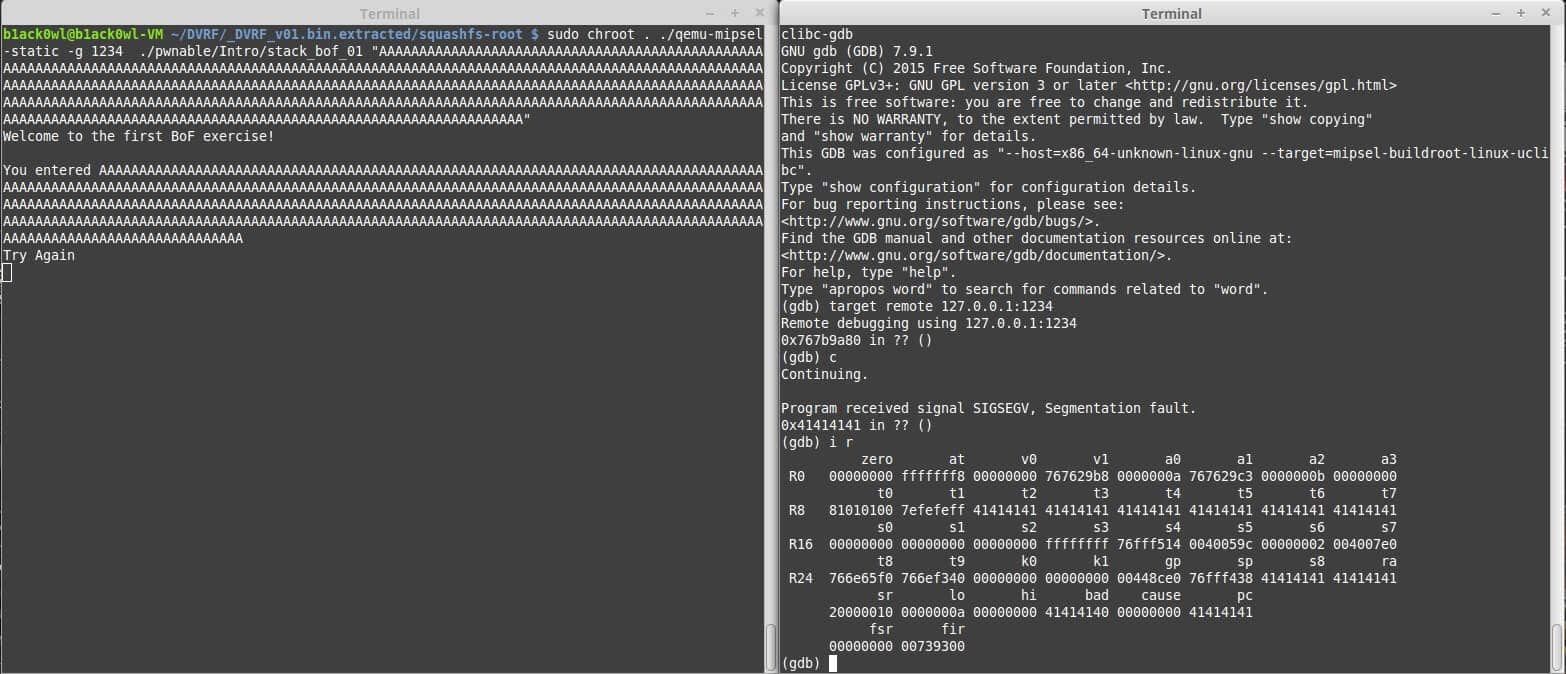
You can see the Segmentation Fault this is due to a pointer within the stack being corrupted during the overflow. Your goal is to make this program not segfault so use the tools I provided and make sure to use breakpoints! To get you started here is a proof of concept:
I hope this has helped you get started into your journey into embedded device exploitation. If you have any questions feel free to find me on twitter at @b1ack0wl
DVRF v0.1 has been released on GitHub!!