Overview
The number of SaaS products that businesses integrate into their workflows and processes continues to grow. BMC [1] reports 85% of small companies to have between 25-50 SaaS services in use. Larger organizations (greater than 250 employees) have more than 100 SaaS applications in place. The benefits of SaaS are undeniable: reduced time to benefit, feature maturity, ease of use, and lower cost.
While total cost of ownership can be lower than in-house development or traditional third party software models, business often overlook the reality that the cost of SaaS is not limited to the per user expenses for each service.
One not insignificant cost is to a company’s IT team, who are responsible for managing employee and customer users across multiple systems and keeping each system secure. Even in a small company with a dozen SaaS applications and a single sign-on (SSO) solution, managing employee users may take several hours per week. In larger businesses with more applications, the IT cost is amplified.
A unified identity management process helps reduce IT cost, while also improving overall security and automating scalability. In this article, we provide a guide for implementing a consistent identity process to help IT manage security effectively while keeping IT cost to a minimum. The guide is based on Praetorian’s own experience and tooling.
The Goal
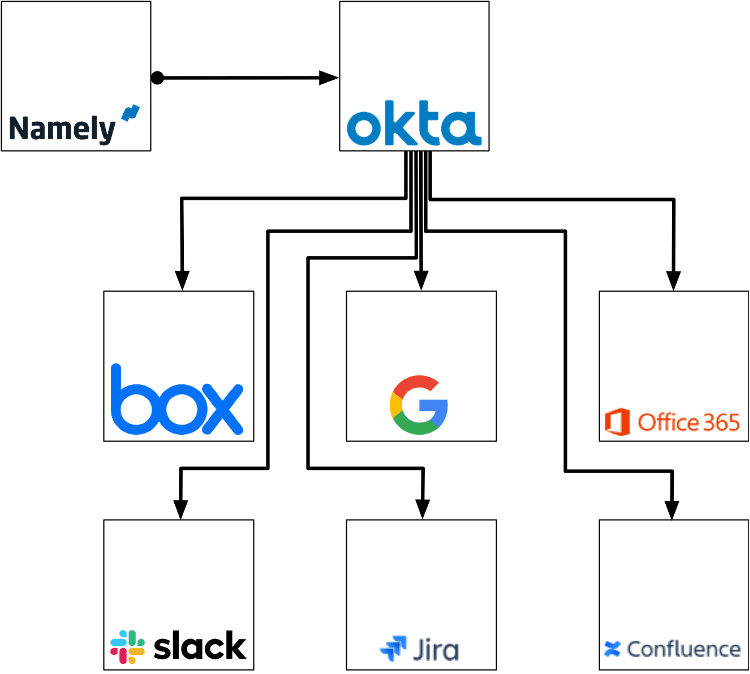
The goal we recommend is to have user information mastered in your Human Resources Information System (HRIS) pushed out to all your SaaS platforms automatically, eliminating delays and human error in keeping all SaaS identity information current and accurate.
This end state is also a benefit to the company in the form of risk reduction. Users will have consistent user groups that can be used across all services to publish and share information internally.
Getting Started – Prerequisites
The intent is to show the process and the design decisions that work most effectively in this deployment. A step-by-step guide is beyond the scope of this article. However there will be guidance to help avoid issues that can affect the success of the implementation and/or waste your time.
This guide assumes you have an SSO solution in place in your environment and several applications already integrated with it. In this case, Okta is our SSO, and directory information will come from Okta’s Universal Directory service. Namely is our HRIS and common applications like those shown in the figure above will be used to highlight use cases for the unified identity management end goal.
Connecting HRIS to SSO
Planning
Before you start any of the integration steps, you will work with your HR team and agree on a set of departments and the naming for them to be used from your HRIS and through all your applications.
A reasonable subset of department names will resemble the following:
- Finance
- PeopleOps
- Marketing
- Engineering
- Product
- IT
Review the documentation for your HRIS to understand how the service will push over user and department data to Okta. Sometimes your assumptions will be wrong. More on that below.
In the case of Namely and Okta, the process is best thought of as a push and not a sync. Okta does not delete users that are not in Namely when you run your first sync. Okta users that match existing Namely users will have their profile data updated. Okta users that do not match Namely users are ignored and get no updates (now or in the future).
Create Consistency
Go through all of your existing applications and reconcile the department group names in each application to match your list.
This is a required step in the process. You are creating consistency for your users by having the exact same names for every department in every application. If the Engineering department is “Engineering” in some services and “Product Development” in others, this will only create confusion and frustration for your users.
Note that this consistency is not just for your users’ benefit. Completing this step will also reduce your information security risk. When users know there is a standard name for every department everywhere, you are making it easy for them to make the right choices when they want to share information.
Make sure you publish the new department naming standards on an internal documentation site for easy reference as you start this process. Changing well-known group names across services may create some confusion initially.
Making The Connection
Your HRIS will have specific steps to connect it as a profile source to your SSO. The process for connecting Namely and Okta is well documented by Okta and can be completed within a few minutes. In the case of Namely and Okta, this process is non-destructive. Okta matches Namely user names to Okta users and inserts Namely profile data for those matched users. If a user exists in Okta and not in Namely, nothing happens to the Okta user.
As the final step in this process, you will need to set up Group pushes from Okta to each application in your organization. At a minimum, you must push all of the departments you defined while working with your HR team. If you choose to push more groups, make sure to push them consistently across your applications.
Lessons Learned
Department names
Something that wasn’t clear before this process started was how Namely would push departments to Okta. As a result, some special handling was required to make departments work the way they were intended.
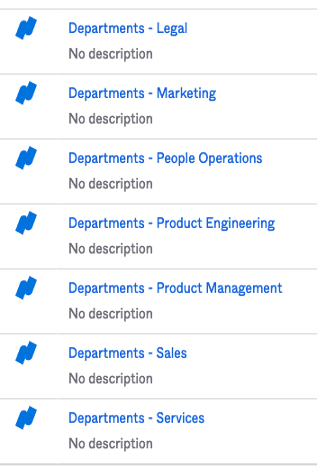
Namely syncs all departments to Okta as groups in the form “Departments – (Department Name)”. This is not a configurable option and Okta will always end up with a list of departments like the one below.
Most users would rather enter “Marketing” or “Engineering” instead of the longer forms above.
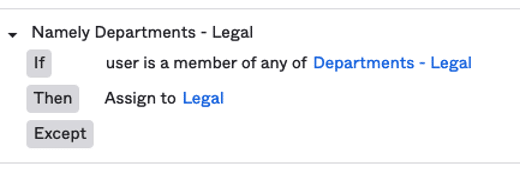
In Okta, a feature called Group Rules provided a workaround so that users could keep using the short department names.
A Group Rule was defined for each Namely-pushed group to automatically add users from the Namely group into the user friendly groups used across the SaaS products. See this example for how the Group Rule was defined.
User Names
One other unexpected behavior was the handling of people’s names. The HRIS has the legal first name for each person as required for handling payroll and tax reporting.
In the case of Namely, the service provides a Nickname field where users can specify that they prefer “Dan” vs. “Daniel”. Namely even pushes this Nickname with the rest of the user profile into the user’s Okta record. This would seem to resolve the problem and allow users to appear in all services with their preferred first name.
This was not the case, and it took multiple attempts to resolve.
Initially, an Okta expression was put into the user profile for the first name:
(user.nickName == null or user.nickName == "") ? (user.firstName) : (user.nickName)
The expectation was that any user who had provided a nickname in Namely would have that name shown as their first name in Okta and also pushed all the services where Okta synced user profiles.
In practice, the behavior across services was inconsistent.
Some services accepted the profile and used the first name the user specified. Other services received the SAML assertions from Okta and saw a different first name. These services proceeded to update the user first name field for that service, ignoring the user profile data Okta had pushed to that service.
The resolution chosen was to allow users to edit their first name in their Okta profile. This would allow the HRIS to maintain the legal name and user name preferences could still be honored. The implementation was accomplished with multiple steps.
In Okta, we disabled Namely’s mastering of the users first name.
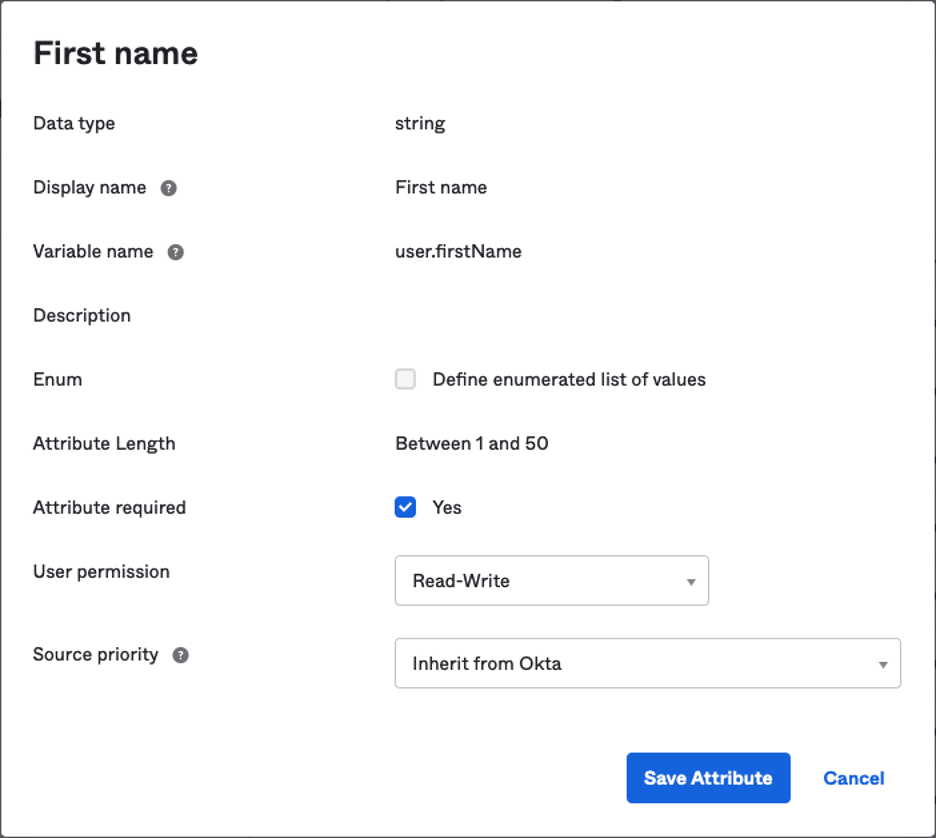
In the Okta profile editor, users are granted read/write permission to the firstName field in Okta and Okta is listed as the source of this information:
If a user wants to change their first name, they can do so in their Okta personal profile settings and the name is pushed to all services.
Leveraging Consistent Identity
With identities in sync across all services, there are certain obvious efficiencies like being able to share something with a department no matter what application is being used. Sharing with Sales in the Box app? Choose “Sales” in the sharing panel. Want to grant access to a Confluence page to the Sales team? Add “@Sales” to the shared user list. Slack your message to the team with “@Sales”.
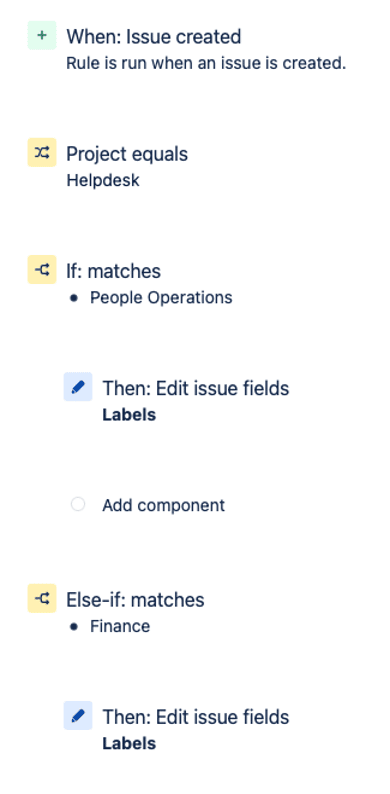
Universal identities can also be used to power automation in your services as well. As an example, it is possible to use the Departments together with JIRA automations to automatically assign a team label to tickets as they come in.
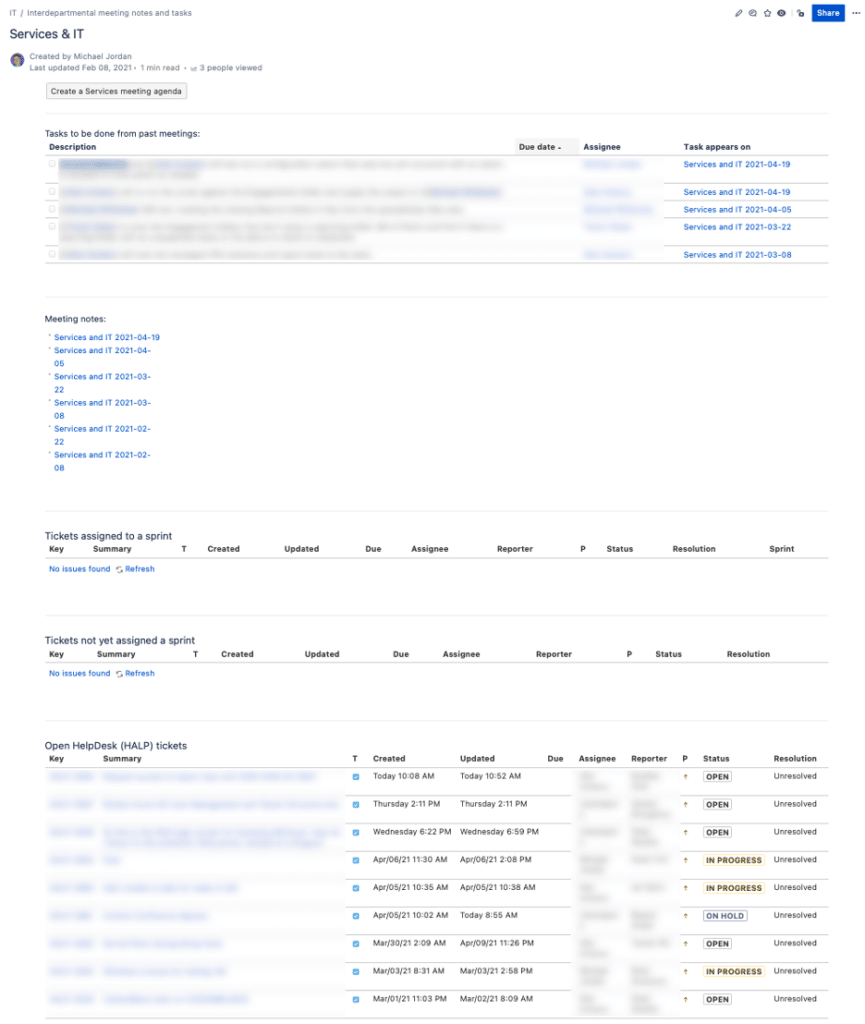
Combine these automatically tagged tickets with JQL searches embedded in a Confluence page and you have a per-department status page for tickets your team is working for that department:
Conclusion
Increasing user effectiveness using unified identity will make a better user experience for your team members and reduce risk in your SaaS services. If you are in IT, this process will measurably reduce time spent managing the user and group information in your SaaS services.
The transition phase will be the most challenging part. People are used to their existing patterns and change creates some stress. Take the time to explain to your team why making groups the same across the services will lead to a better experience for them in the long term.
References
[1] BMC: “SaaS in 2021: Growth Trends & Statistics” : https://www.bmc.com/blogs/saas-growth-trends/

